
Opposite Bishops: The Fortress
Two pawns down with opposite-coloured bishops — learn to build a light-square blockade with king and bishop that White's dark-squared bishop can never break.
Try Interactive LessonIntroduction
Lesson Content
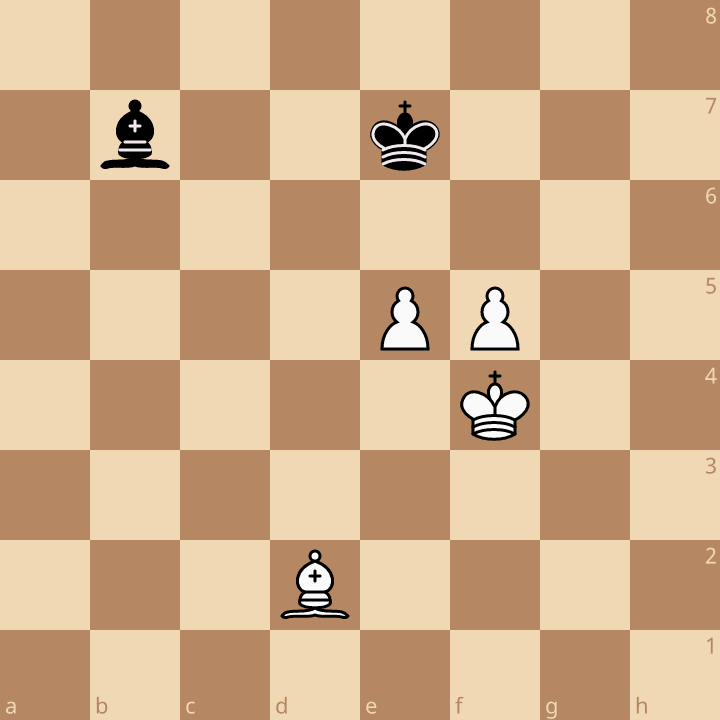
Only one move holds the draw: make sure the e-pawn can never advance safely.
Onto the right diagonal! ♗︎c8 puts the bishop on the c8–h3 diagonal, where it does two jobs at once: it controls e6, the square in front of the e-pawn, so the pawn can never advance without being captured — and it attacks f5 from behind, so White's king must stay next to that pawn to keep it. Watch the colours: e6 is a light square and White's bishop is dark-squared, so it can never fight for e6. A pawn whose next square only your bishop can control is blockaded for good. This is the only drawing move — every other move lets a pawn through to queen.
Alternative Moves
♔︎g5 brings the white king to its most active square. From g5 it guards f5 and eyes g6 — with Black's king still on e7, nothing stops ♔︎g6 next, after which the white king would walk in via g7 and escort the pawns to promotion. Black must deal with that threat right now.
White's king wants to walk into your camp — shut the door and complete the blockade.
The king takes its post. ♔︎f7 does three things: it stands in front of the f-pawn, it guards e6 together with the bishop, and it keeps White's king out of g6. And f7 is a light square — White's dark-squared bishop can never check the king there or drive it away. This is the complete fortress: king on f7, bishop on the c8–h3 diagonal, both on light squares the white bishop cannot touch. Neither pawn can advance without being captured for nothing.
Alternative Moves
White can't make direct progress, so it starts probing. ♗︎b4 puts the bishop on a diagonal that controls e7 and f8, two squares next to Black's king. White hopes that Black, short of useful moves, will step the king off f7 or let the bishop wander — either would free a pawn to advance.
White is probing. Keep the blockade intact without loosening your grip on either pawn.
Black has to move something, so ♗︎d7 simply slides the bishop along its diagonal. On d7 it still covers e6 and still attacks f5, so White's king stays tied to the pawn and nothing has changed. On the c8–h3 diagonal the bishop has exactly two safe squares: c8 and d7. On e6 the f-pawn would take it, and on f5 White's king would — either way you would be a piece down and the pawns would queen. Shuttling between c8 and d7 is the whole plan.
Alternative Moves
Another waiting move. ♗︎d6 keeps the bishop on e7 and f8 and now also watches c7 and b8 — but it changes nothing on the light squares. e6, f7, d7 and c8 are out of its reach for ever, so the blockade cannot be attacked.
Same question, new bishop square — find the move that changes nothing.
♗︎c8 — back to the other safe square. The rhythm is simple: shuttle the bishop between its two safe squares. The king stays on f7, the bishop never leaves its diagonal, both pawns stay frozen, and White gets nowhere.
Alternative Moves
White tries yet another square. ♗︎c7 covers d8 and b8, but again none of this touches the light-squared fortress — no pawn can advance and no black piece can be attacked.
Keep shuttling — make the move that keeps both pawns frozen.
♗︎d7 again. The white bishop can visit every dark square on the board, but the fortress lives on light squares: f7, e6, d7 and c8. That is why opposite-coloured bishops draw so often — the attacking bishop simply cannot contest the blockade, so the extra pawns never queen.
Alternative Moves
The last bishop try: ♗︎d8 controls e7, taking yet another square from Black's king. But Black doesn't need king moves at all — the bishop always has its second square, so there is no zugzwang to fall into.
White has run out of probes. Hold the fortress one more time.
♗︎c8 once more. White has tried four different bishop squares and Black answered every one with the same shuttle. There is no zugzwang in this fortress, because the bishop always has a free square on its diagonal — Black never runs out of safe moves, so the pawns never advance.
Out of ideas, White breaks with e6+ and gives check, hoping Black recaptures the wrong way or not at all. Because both the king on f7 and the bishop guard e6, this break costs White both pawns.
Deal with the check so that both white pawns come off the board.
♗︎xe6 takes the pawn with the bishop. White's only follow-up is to recapture with the f-pawn, and then your king takes that pawn too — no pawns are left and the game is a dead draw. This is exactly why the king belongs on f7: it stands ready to finish the job.
Alternative Moves
fxe6+ recaptures with check. The last pawn stands on e6, right next to Black's king — and nothing defends it.
The last pawn is unprotected — resolve the position.
♔︎xe6 — draw! Black gave up the bishop for both pawns, and what remains is king and bishop against a bare king — insufficient material, neither side can ever force mate. Two pawns down, Black held comfortably because every defender stood on light squares White's bishop could never challenge.
Key Takeaways
- With opposite-coloured bishops, blockade the pawns on squares of your own bishop's colour — the attacking bishop can never contest them
- Put your king directly in front of the pawns, on a square the enemy bishop cannot attack
- Your bishop should guard the blockade square and attack the pawns from behind, tying the enemy king to their defence
- Once the fortress stands, shuttle the bishop between its safe squares on the diagonal — never move the king off its post
- A bishop that only blocks (like ♗︎d5 here) is not enough — it must also hit the pawns
Now play it through
Step through every move on a real board, try the wrong ones, and ask Knighty why they fail.
Related Lessons
Summary
Ready to Practice?
Next in this course
Queen and Pawn vs Queen
Take this lesson with you
Free account requiredWith every variation — opens in Lichess & ChessBase