
Queen and Pawn vs Queen
Learn how to promote a pawn against a checking queen — shelter your king beside the pawn, block checks with a protected queen that offers a trade, and push when the checks run out.
Try Interactive LessonIntroduction
Lesson Content
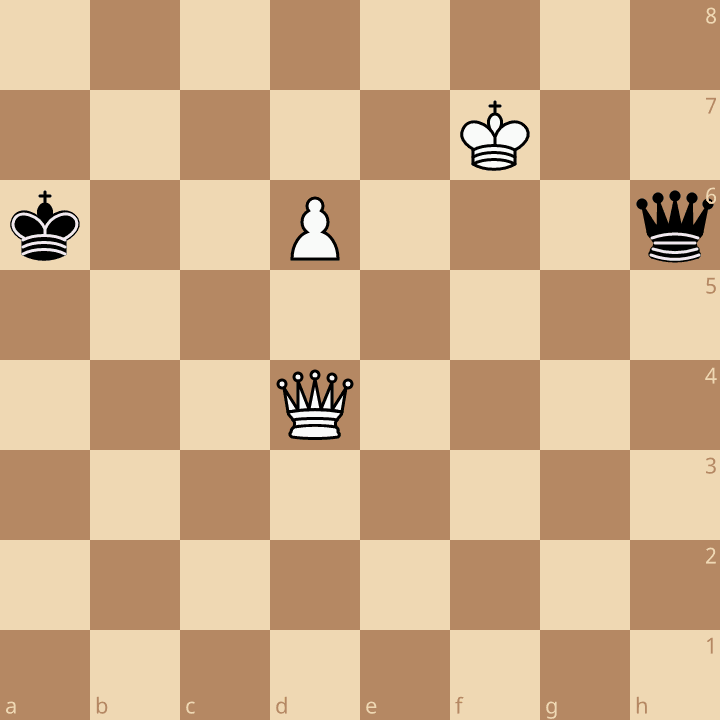
Your king is not in check yet — spend this one quiet tempo before the chase begins.
d7 uses the one quiet moment before the checks begin: the pawn reaches the seventh rank, still guarded by the queen along the d-file, and now needs a single step to become a queen. The tablebase is blunt about it — this is the only move that wins. Every other move gives Black time to start checking while the pawn is still two steps from queening, and against a pawn that far back the checks never run out.
Alternative Moves
♕︎h5+ is the check that holds out longest. Black cannot stop the pawn by force — the queen on d4 guards d7 — so the whole defence is to chase the white king and hope it never finds shelter. Notice the black king on a6: it is far too far away to help, which is exactly why the shelter method works.
Escape the check without letting the pawn fall.
♔︎e6 steps out of check toward the pawn, not away from it: the king now guards d7 itself and stands one step from the shelter square behind the pawn. The check came along a diagonal, so the king also walks off that diagonal — the queen has to find a new line before it can check again.
Alternative Moves
♕︎h3+ finds the new diagonal. Black's queen has only two kinds of check left — along diagonals and along ranks — and each time it finds one, the white king answers by stepping to a square where the pawn is still covered.
Escape the check while keeping the pawn out of the queen's reach.
♔︎d6 tucks the king directly behind its pawn. From d6 it guards d7, and the pawn and queen between them leave Black only a handful of checks, along the sixth rank and two diagonals — none of which drives the king away for long. This is the shelter, the first idea of the method: the king is safest right next to the pawn it is escorting.
Alternative Moves
♕︎h6+ checks along the sixth rank — the longest the defence can hold here. The queen cannot take on d7: the pawn is guarded by king and queen alike, so ♕︎xd7+ would simply lose the queen for a pawn.
Escape the check without stepping into the open.
♔︎c5 sidesteps the rank check. The king leaves the pawn for one move, but the pawn stays safe: the queen on d4 still guards d7 along the open d-file. What the king must avoid is the open board in front of the pawn — out there every new line is a new check, and the pawn is eventually lost.
Alternative Moves
♕︎g5+ checks along the fifth rank. Each check costs Black nothing, so the defender keeps probing — but the white king is about to reach a square where the checks can be blocked for profit.
Escape the check and get the king back to its shelter beside the pawn.
♔︎c6 brings the king back beside the pawn — c6 touches d7 — and with it the queen on d4 is relieved of guard duty. Now the queen is free for the second job of the method: block the next check on a square the king protects.
Alternative Moves
♕︎g2+ checks along the long diagonal. Three squares lie between the queen and the king, and White can block on any of them — but blocking on a square nobody protects simply hangs the queen.
Meet the check with a block that Black cannot afford to take.
♕︎d5 blocks the check on a square the king protects, and that turns the block into a trade offer Black cannot accept: after ♕︎xd5+ ♔︎xd5 the black king on a6 is too far away, and nothing stops the pawn from queening next move. So Black must keep the queens on — and every new check now has to avoid the squares the white pieces cover.
Alternative Moves
♕︎g6+ switches to the sixth rank. Black avoids the trade — it would lose at once — and looks for a check the white pieces do not cover. There are fewer of those every move.
Same idea again — meet the check with a block Black cannot capture.
♕︎d6 is the same protected block one rank higher, guarded by the king on c6 and offering the same trade: after ♕︎xd6+ ♔︎xd6 the pawn queens and Black's king cannot interfere. Black is now down to a single check that does not lose the queen on the spot.
Alternative Moves
♕︎c2+ is the last safe check, along the c-file. Every other check lands on a square White covers or trades into the lost pawn ending.
Find the escape that turns the tables — make Black the one answering a check.
♔︎d5+ steps out of check and gives one back: moving off c6 unmasks the queen on d6, which now checks the black king along the sixth rank. This is the third idea — when the checks will not run out by themselves, a check of your own ends them. Black has to answer this check instead of giving another, and that is the tempo the pawn needs.
♔︎b5 is the longest defence. Every reply loses: the queen's one block, ♕︎c6+, would be captured for nothing, and the other king moves let White mate sooner. From b5 the black king keeps a watch on the queen on d6, but it cannot reach d8.
No safe check is left for Black — finish the job.
d8=♕︎ — the pawn promotes. Black can still throw in a few checks from the second rank and the long diagonal, but with two queens against one the tablebase mates in 13 moves, counting this one. Look back at the route: the king hid behind and beside its pawn, the queen blocked every check it could on a protected square, and when one check remained, the king stepped aside with a check of its own. Only then did the pawn move — and then it queened.
Alternative Moves
Key Takeaways
- Every quiet tempo belongs to the pawn — push it before the checks begin, not after
- Shelter your king behind or beside its own pawn: that is where the checks run out
- Block checks with your queen only on squares your king protects — the block offers a trade the defender cannot accept
- An unprotected block or a counter-check on an unprotected square simply loses the queen
- When one safe check remains, look for a check of your own — it ends the series and wins the tempo to promote
Now play it through
Step through every move on a real board, try the wrong ones, and ask Knighty why they fail.
Related Lessons
Summary
Ready to Practice?
Take this lesson with you
Free account requiredWith every variation — opens in Lichess & ChessBase