
Short-Side Defense
Hold rook and pawn vs rook when Philidor is too late: put your king on the short side of the pawn and your rook on the long side, checking from a distance.
Try Interactive LessonIntroduction
Lesson Content
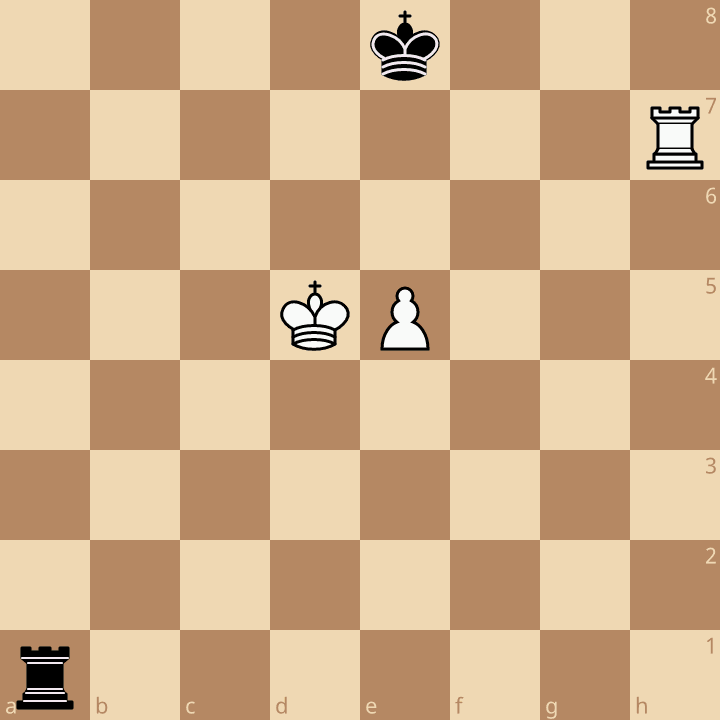
White's king steps onto the 6th rank in front of its pawn. A Philidor setup is no longer possible — the king is already where your rook would have wanted to stop it. White now threatens ♖︎h8#: the king on e6 covers d7, e7 and f7, and a rook on h8 would cover the whole back rank, so your king would have no square. Your king has to choose a side right now.
Mate is threatened — pick the side of the pawn where your king will never block its own rook.
♔︎ing to the short side! ♔︎f8 escapes the mating net, and just as important it gets out of the way of your own rook: the whole long side (a- to d-files) stays free for checks from a distance, so the white king will never be able to settle beside its pawn. (A side check from a6 would also hold, but the king move is the one that teaches the method.)
Alternative Moves
White's sharpest try: the king follows to f6 and again threatens ♖︎h8# — from f6 it covers e7, f7 and g7, so a rook check on h8 would be mate. Your rook must act at once.
Mate is threatened again, and only one move stops it — find the check that drives the king away.
The only drawing move. When the white king steps onto the short side next to your king, check it from behind: ♖︎f1+ drives the king off the f-file, and with it the mate threat on h8 is gone. A side check from a6 does not work here — the pawn can block it, as the alternative shows.
Alternative Moves
The king has to leave the f-file, and it goes back to e6 to stay in front of its pawn. Hiding on g6 or g5 would leave the pawn unprotected and your rook would simply pick it off along the e-file.
The threat is parried — put the rook back where it can check from the greatest distance.
♖︎ook back to the long side! Its job on the f-file is done, so ♖︎a1 returns it to the a-file — four files away from the e-pawn, the ideal checking distance, where no white piece can chase it off. We are back in the position from move one: White has made no progress.
Alternative Moves
White changes plan: the rook checks from h8 to push your king one square further from the pawn, so that the rook can then swing over to the d-file and support the pawn's advance.
Get out of check — there is only one legal square.
Forced — ♔︎g7 is the only legal move. That is fine: your king is still on the short side, close enough to the pawn's promotion square to stop it, and your rook on a1 is still far away on the long side, ready to check.
White's rook moves to d8, preparing to bring the king forward to e7 or d7 and then push the pawn. If the white rook ever settles on the d-file next to its king, it can also be used to block your side checks.
The white king is exposed — check it from as far away as possible.
The long-side check! ♖︎a6+ hits the king along the 6th rank — three empty files (b, c, d) separate the rook from the king on e6. This is why the rook belongs on the long side: from so far away, the king cannot walk up to the rook to stop the checks without abandoning its pawn to your king.
The king steps forward to e7, trying to escape the checks by running toward the promotion square. It wants to play e6 next with the king in front of the pawn.
Follow the king — keep it from ever settling beside its pawn.
♔︎eep checking from the side. ♖︎a7+ follows the king onto the 7th rank, still from the far a-file. The white king cannot settle anywhere near its pawn, so the pawn cannot advance.
The king hides on e8, in front of the pawn's path, where no side check is available right now. White hopes to follow up with e5-e6 and march the pawn to e7.
No check is available — find the only move that stops the pawn from advancing.
The only drawing move. ♖︎a6 takes control of the 6th rank, so the pawn cannot advance: if e6, then ♖︎xe6+ wins the pawn with check, and the game is a dead draw. Your rook stays on the a-file, still on the long side.
Alternative Moves
White blocks the 6th rank with the rook on d6, so the pawn would be supported if it advances. But the rook has left d8, and that frees the whole 8th rank for your rook.
The white rook just left a rank open — use it to chase the king again.
The only drawing move: ♖︎a8+ is a side check along the 8th rank. The b8, c8 and d8 squares are empty, so the rook hits the king on e8 from four files away. Again the king must move and the pawn stays put.
The king returns to e7. White is going in circles — every square near the pawn is a square your rook can check.
Same idea as before — keep the king on the run.
♖︎a7+ is another check from the side along the 7th rank. The pattern is always the same: whenever the king steps onto a rank your rook can reach, check it from the long side, and the pawn never gets a free move.
White blocks the check with the rook on d7. Now the white rook stands between your rook and the king, so the a-file checks are over for the moment.
The check is blocked — keep the rook at a distance and on a line the king needs.
Stay far away on the long side. From a8 the rook controls the whole 8th rank — the white king cannot step to d8, e8 or f8 — and ♖︎a8 keeps it ready to check again as soon as the king moves. (♖︎a6 also draws; ♖︎a1 to ♖︎a5 would lose, because the rook then neither guards the 8th rank nor stops e6.) White has tried everything and made no progress: king on the short side, rook checking from the long side, and the draw holds.
Key Takeaways
- Every pawn has a short side and a long side — for an e-pawn the short side is the kingside (f–h), the long side the queenside (a–d)
- King to the short side, rook to the long side: 1...♔︎f8! holds, 1...♔︎d8? loses
- Side checks need distance — the rule of thumb is at least three files between rook and pawn (here ♖︎a1 holds, ♖︎d1 loses)
- If the king joins yours on the short side with a mating threat, check it from behind (♖︎f1+), then return the rook to the long side
- When the king hides in front of the pawn, guard the 6th rank (♖︎a6) so the pawn cannot advance
Now play it through
Step through every move on a real board, try the wrong ones, and ask Knighty why they fail.
Related Lessons
Summary
Ready to Practice?
Next in this course
Opposite Bishops: The Fortress
Take this lesson with you
Free account requiredWith every variation — opens in Lichess & ChessBase