
Englund Gambit — Refutation
Learn how White refutes the Englund Gambit with rapid development, punishing Black's greedy pawn grab.
Try Interactive LessonIntroduction
Lesson Content
Claim the center with your queen pawn.
d4 — The Queen's Pawn opening — White claims the center with the d-pawn, which is immediately defended by the queen. This tends to lead to more strategic, closed positions compared to 1. e4. Black's main responses: - 1. ..d5 — Queen's Gambit and Slav setups - 1. ..♘︎f6 — Indian Defenses (King's Indian, Nimzo-Indian, etc.) - 1. ..f5 — Dutch Defense
The Englund Gambit! Black sacrifices a pawn immediately, hoping for rapid piece activity and tactical tricks. Objectively dubious (Black loses about a pawn's worth of evaluation), but dangerous against unprepared opponents. Black's plan: after 2. dxe5, play ..♘︎c6 and ..♕︎e7 to pressure the e5 pawn, then raid with the queen on the queenside.
Alternative Moves
Accept the free pawn.
dxe5 — Accept the pawn! There is no reason to decline — White wins a clean pawn and maintains a strong center. The extra e5 pawn controls key squares (d6, f6) and cramps Black's position. Principle: accept gambits when you can hold the material safely.
Alternative Moves
Black develops the knight and attacks the e5 pawn. This is the standard continuation — the knight pressures e5 and prepares the queen maneuver to e7. Black hopes White will have trouble defending the extra pawn.
Develop a piece that also defends the extra pawn.
♘︎f3 — Develop and defend! The knight protects the e5 pawn while developing to its best square. White follows the classic principle: develop pieces to natural squares before worrying about anything else. The knight on f3 also prepares kingside castling.
Alternative Moves
The Englund Gambit's signature move — the queen targets the e5 pawn and prepares the tricky ..♕︎b4+ maneuver. This is what makes the gambit dangerous: the queen will invade via b4 to grab the b2 pawn. But White has a clean way to handle this threat.
Alternative Moves
Develop your bishop to support the e5 pawn.
♗︎f4 — Develop the bishop to an active square, reinforcing the e5 pawn. The bishop on f4 controls key dark squares and is placed before e3 would block it in. Now if Black plays ..♕︎b4+, the bishop can retreat to d2 blocking the check while maintaining coordination.
Alternative Moves
Black checks the king, forcing White to respond. The queen is heading for b2 to grab a pawn — this is the heart of the Englund Gambit trap. Many players panic here and make a mistake. But White has a simple, strong response.
Block the check with your bishop.
♗︎d2 — Block the check by retreating the bishop to d2. This looks passive, but it's actually the best move — White loses no material and the bishop on d2 still serves a useful defensive role. The key: don't panic against checks — calmly block when possible.
Alternative Moves
Black grabs the b2 pawn — the Englund Gambit's main idea. Black has now won back the gambit pawn, but the queen is far from the action on b2. This greedy capture is the critical mistake. White will now gain a massive development advantage while Black's queen is trapped on the queenside.
Alternative Moves
Develop a piece that attacks the queen.
Develop with tempo! The knight comes to c3, threatening the queen on b2 and eyeing the powerful d5 outpost. Black's queen must waste another move retreating. White already has three pieces developed (♘︎f3, ♗︎d2, ♘︎c3) while Black has only the ♘︎c6.
Alternative Moves
Black develops the bishop attacking the ♘︎c3, trying to generate some counterplay. The bishop also provides a retreat square for the queen if needed. But White's next move will force further concessions.
Attack the queen with your rook.
♖︎b1 — Attack the queen! The rook swings to b1, targeting the exposed queen on b2. Black's queen has very few safe squares — it's practically trapped on the queenside. Principle: exploit misplaced enemy pieces by cutting off their escape routes.
Alternative Moves
The queen retreats to a3 — the only safe square. On a3 the queen is out of play, far from the kingside and unable to help with defense. Black has regained the pawn but at a tremendous cost in development. White now has a devastating move available.
Jump your knight to the most powerful central square.
The killer move! The knight leaps to d5, the most powerful central outpost. From d5, the knight threatens ♘︎xc7+ (forking king and rook) and attacks the ♗︎b4. Black is in serious trouble. The ♘︎d5 is a textbook example of a dominant centralized knight — it controls key squares and creates multiple threats simultaneously.
Alternative Moves
Black captures the bishop on d2, giving check. This eliminates one of White's defenders but opens the queen's path to recapture. Black has no better option — the threats of ♘︎xc7+ and ♘︎xb4 were too strong. After recapture, Black will need to address the ♘︎xc7+ fork.
Alternative Moves
Recapture with your queen to keep the knight on d5.
♕︎xd2 — Recapture with the queen, maintaining the powerful ♘︎d5. White's queen on d2 is well-placed — it controls the d-file, supports the knight, and can swing to the kingside if needed. Now Black must deal with the deadly ♘︎xc7+ fork.
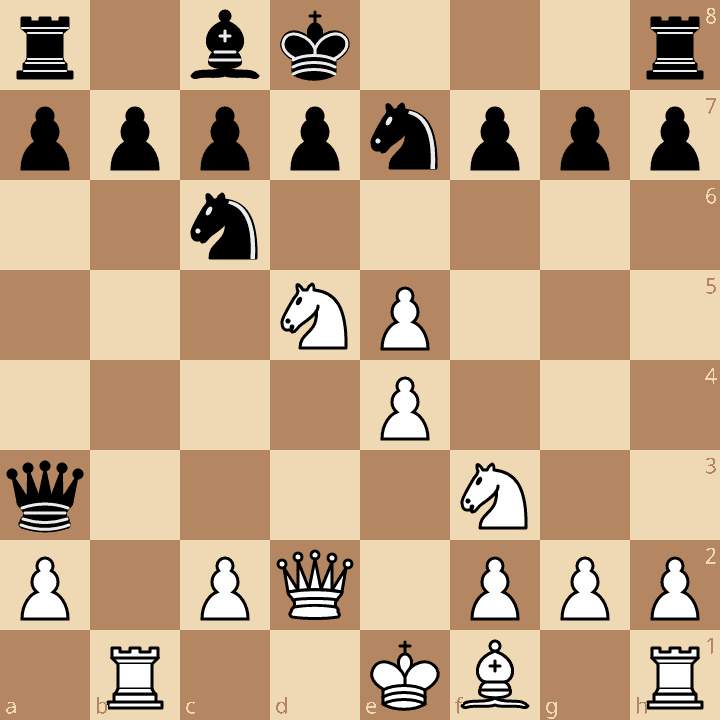
Black moves the king to d8, the only way to prevent the devastating ♘︎xc7+ fork (which would attack the king on e8 and the rook on a8 simultaneously). But now Black can never castle — a permanent weakness. The king on d8 is exposed and vulnerable to future attacks.
Expand your pawn center to dominate the board.
Build a massive pawn center! With pawns on e4 and e5, White dominates the center completely. The pawns control d5, d6, f5, and f6 — cramping Black's entire position. White's plan: develop the bishop (♗︎c4 or ♗︎e2), castle, and convert the overwhelming positional advantage.
Alternative Moves
Black finally develops a second piece, but it's too little, too late. White has a dominant knight on d5, a massive pawn center (e4+e5), the half-open b-file, and will castle shortly. Black's king is stuck on d8 with no safety. The Englund Gambit has been completely refuted.
Key Takeaways
- Always accept the Englund Gambit with 2.dxe5 — White wins a clean pawn
- Develop calmly with ♘︎f3 and ♗︎f4 — no need to panic after ♕︎b4+
- ♗︎d2 blocks the check simply; don't overthink the queen raid
- ♘︎c3 + ♖︎b1 punishes the greedy ♕︎xb2 by trapping the queen on the queenside
- ♘︎d5 is the crushing blow — a dominant central knight with multiple threats
Now play it through
Step through every move on a real board, try the wrong ones, and ask Knighty why they fail.
Related Lessons
Summary
Ready to Practice?
Take this lesson with you
Free account requiredWith every variation — opens in Lichess & ChessBase