
Hedgehog System
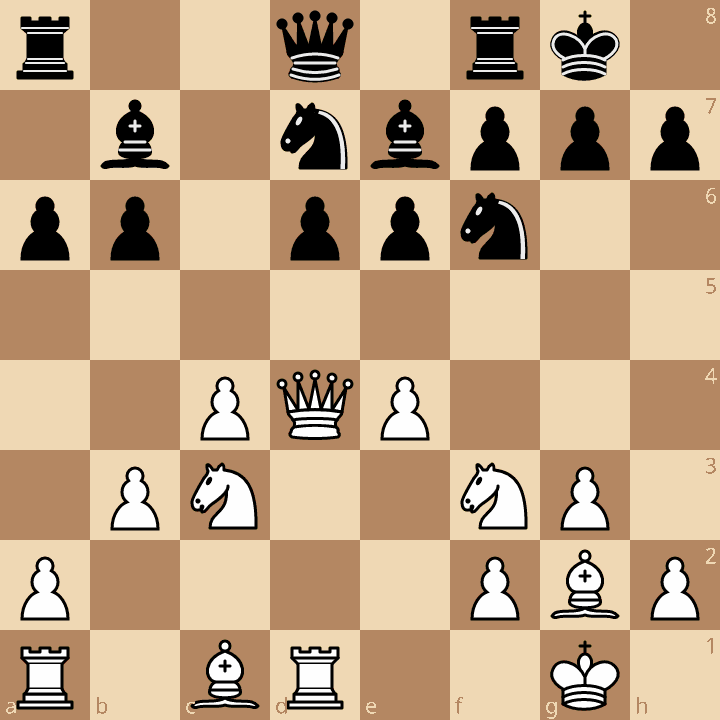
A flexible Black system with pawns on a6, b6, d6, e6 — pieces coil behind the pawn wall, waiting to strike with ...b5 or ...d5.
Try Interactive LessonIntroduction
Lesson Content
The English Opening — White controls d5 from the flank without committing the d-pawn. This is a flexible, positional opening that can transpose into many 1. d4 lines or lead to unique English systems. Black's main options: - 1. ..c5 — Symmetrical English - 1. ..e5 — Reversed Sicilian - 1. ..♘︎f6 — can transpose to Indian setups
Mirror White and fight for the d4 square.
The Symmetrical English — Black mirrors White's flank control, fighting for the d4 square. This is the gateway to the Hedgehog System. By playing ..c5 early, Black signals a willingness to enter structures where both sides develop behind their pawns before committing to central action.
Alternative Moves
White develops the knight to its most natural square, controlling d4 and e5 while preparing kingside castling. A flexible move that keeps many setups available.
Develop your knight to control central squares.
♘︎f6 — Black develops the knight, controlling d5 and e4. This prevents White from building an unchallenged e4 pawn center and prepares flexible development. The knight on f6 is a cornerstone of the Hedgehog — it supports the ..d5 break later.
Alternative Moves
White develops the second knight, reinforcing control of d5 and e4. The Three Knights Variation of the Symmetrical English. White's setup will typically involve g3, ♗︎g2, O-O, and eventually d4 — building a strong center while fianchettoing the bishop.
Set up the pawn structure for the Hedgehog.
Black plays ..e6, preparing the Hedgehog pawn structure. This move supports a future ..d5 break and controls d5, while keeping the position flexible. The e6 pawn will become part of the characteristic Hedgehog wall — pawns on a6, b6, d6, e6.
Alternative Moves
White prepares the kingside fianchetto with ♗︎g2. The bishop on g2 will pressure the long diagonal (a8-h1), aiming at Black's queenside. This is White's most common setup in the Symmetrical English — the fianchettoed bishop combines well with the c4 pawn to control d5.
Prepare to develop your bishop to the long diagonal.
Black prepares to fianchetto the light-squared bishop on b7, directly countering White's ♗︎g2 on the long diagonal. The ..b6 pawn also becomes part of the Hedgehog wall. With ..♗︎b7 coming next, Black will establish powerful influence along the a8-h1 diagonal, contesting White's fianchettoed bishop.
Alternative Moves
White completes the fianchetto. The bishop on g2 is a powerful piece, exerting pressure along the entire long diagonal from a8 to h1. This bishop will be especially strong once the center opens, potentially targeting Black's queenside pawns and the b7 bishop.
Complete the fianchetto to contest the long diagonal.
Black completes the fianchetto, placing the bishop on the long diagonal where it contests White's ♗︎g2. The ♗︎b7 is a key piece in the Hedgehog — it supports the future ..d5 break and creates hidden pressure. The diagonal battle between ♗︎g2 and ♗︎b7 is a defining feature of this opening.
Alternative Moves
White castles kingside, securing the king. With the fianchetto complete and both knights developed, White is ready to fight for the center with d4. Castling also activates the f1 rook, which may later support e4 or shift to the d-file.
Develop the bishop quietly, keeping your position compact.
♗︎e7 — Black develops the bishop modestly to e7, keeping a compact position. This is typical Hedgehog philosophy — avoid committing pieces to aggressive squares too early. The bishop on e7 supports kingside castling and can later relocate to f6 or d8 as needed. Unlike ..♗︎b4 or ..♗︎c5, this quiet development doesn't create targets for White to attack.
Alternative Moves
White strikes in the center, leveraging the developed pieces to grab space. This is the critical moment — White challenges Black to define the pawn structure. After d4, White aims for a large center with c4+d4 (and possibly e4), which gives more space but also creates targets for Black's counterplay.
Exchange pawns to enter the Hedgehog pawn structure.
cxd4 — Black captures on d4 — the defining trade of the Hedgehog. By trading the c-pawn for White's d-pawn, Black concedes the center temporarily but gains a clear plan: set up the compact pawn wall on a6-b6-d6-e6 and wait for the right moment to strike. This trade is the strategic foundation of the Hedgehog. White gets more space; Black gets a resilient structure with latent counterplay.
Alternative Moves
White recaptures with the queen, centralizing it powerfully on d4. The queen controls key squares and eyes both flanks. White's plan is now to build with e4, creating a massive pawn center. The centralized queen supports this expansion while maintaining pressure on Black's position.
Build the Hedgehog pawn wall with your d-pawn.
Black plays ..d6, building the third pawn in the Hedgehog wall. The pawn on d6 is modest but critical — it controls c5 and e5 and keeps the position solid. Three of the four Hedgehog pawns are now in place: b6, d6, e6. Only ..a6 remains.
Alternative Moves
White builds the ideal pawn center — c4 and e4 control the key squares b5, d5 and f5. This is the Maroczy Bind formation, giving White significant space advantage. White's space edge looks imposing, but the Hedgehog philosophy embraces this: Black is compact, flexible, and ready to counterattack when the time is right.
Complete the Hedgehog pawn wall.
The final pawn in the Hedgehog wall! With pawns on a6, b6, d6, and e6, Black's characteristic formation is complete. The ..a6 pawn prevents ♘︎b5 and prepares the crucial ..b5 break. The Hedgehog is now fully assembled. Black's pieces will develop behind this pawn wall — ♘︎bd7, ♕︎c7, ♖︎fc8/♖︎fe8 — coiling up before unleashing ..b5 or ..d5.
Alternative Moves
White places the rook on the half-open d-file behind the queen, adding pressure to Black's d6 pawn. The rook also supports potential central advances. White's plan involves consolidating the space advantage with moves like b3, ♗︎b2, and possibly ♘︎d4 to increase central control.
Develop the knight to support your future breaks.
♘︎bd7 — Black develops the knight to d7 — the ideal square in the Hedgehog. From d7, the knight can go to c5, where it hits e4 and backs the ..d5 break. It also eyes e5. This is classic Hedgehog piece placement: the knight on d7 is flexible and contributes to multiple plans without overcommitting.
Alternative Moves
White prepares to develop the dark-squared bishop to b2, completing the development. The bishop on b2 will add pressure along the a1-h8 diagonal and support the central pawns. With b3, White also strengthens the c4 pawn and creates a solid pawn chain. White's position is strong but must be careful — pushing too aggressively can trigger Black's counterattack.
Castle to safety and complete your development.
O-O — Black castles kingside, completing development. The Hedgehog setup is now fully deployed — compact pawn wall on a6-b6-d6-e6, bishop pair on b7 and e7, knights on d7 and f6. From here, Black's plan involves ♕︎c7, doubling rooks on the c-file or e-file, and waiting for the perfect moment to play ..b5 or ..d5. Patience is the Hedgehog's greatest weapon.
Alternative Moves
Key Takeaways
- The Hedgehog pawn wall (a6, b6, d6, e6) is compact but full of latent energy
- Patience is key — develop all pieces before attempting ...b5 or ...d5
- The ♗︎b7 contests the long diagonal and supports future central breaks
- ♘︎bd7 is the ideal knight placement, supporting both ...b5 and ...d5
- White's space advantage looks imposing but Black's position is hard to crack
Now play it through
Step through every move on a real board, try the wrong ones, and ask Knighty why they fail.
Related Lessons
Summary
Ready to Practice?
Next in this opening family
English Opening - Symmetrical Variation
Take this lesson with you
Free account requiredWith every variation — opens in Lichess & ChessBase