
Legal's Mate
A classic queen sacrifice trap from the Philidor Defense. White gives up the queen to deliver a stunning knight-and-bishop checkmate.
Try Interactive LessonIntroduction
Lesson Content
Start by controlling the center with your king pawn.
e4 — The King's Pawn opening — White claims the center and opens diagonals for the queen and kingside bishop. The most popular first move in chess. Black's main responses: - 1. ..e5 — Open Game, matching White's center - 1. ..c5 — Sicilian Defense, fighting for d4 asymmetrically - 1. ..e6 — French Defense, preparing ..d5 - 1. ..c6 — Caro-Kann, also preparing ..d5
Black mirrors White's central claim, establishing a symmetrical pawn center. This leads to the Open Games — the oldest and most classical family of openings. The e5 pawn controls d4 and f4, limiting White's expansion options.
Develop your knight toward the center while attacking the e5 pawn.
♘︎f3 — White develops the knight to its most natural square, attacking the e5 pawn immediately. The knight also controls d4 and prepares kingside castling. This is the most common second move, leading to a vast tree of openings including the Italian, Ruy Lopez, and Scotch.
The Philidor Defense — Black defends e5 with the d-pawn rather than developing a piece. This is solid but passive, as it blocks the dark-squared bishop behind the pawn chain. Named after François-André Danican Philidor, the strongest player of the 18th century.
Develop your bishop to target Black's weakest square.
♗︎c4 — The bishop develops to c4, targeting the vulnerable f7 square. In the Philidor, this is particularly effective because Black's dark-squared bishop is stuck behind the d6 pawn, leaving f7 weaker than usual. This move begins setting up Legal's Mate — the bishop will deliver a crucial check on f7 later.
Alternative Moves
Black pins the ♘︎f3 against the queen — a natural-looking move, but it has a hidden danger. The pin appears strong since the knight can't move without exposing the queen, but White can exploit this brilliantly. The safer alternatives 3. ..♘︎f6 or 3. ..♗︎e7 develop without creating this vulnerability.
Develop your other knight while preparing a devastating combination.
♘︎c3 — White calmly develops the knight, seemingly ignoring the pin. But this move has a hidden purpose — the knight on c3 controls the crucial d5 square, which will be the mating square. With three minor pieces developed and the ♗︎c4 aimed at f7, the combination ♘︎xe5 + ♗︎xf7+ + ♘︎d5# is now in the air.
Alternative Moves
A careless move that further weakens the kingside. The g6 push weakens f6 and does nothing to meet the ♘︎xe5 trick. Black should instead play 4. ..♘︎c6 or 4. ..♘︎f6, developing pieces. This is the move that allows Legal's Mate. White now strikes!
Move the pinned knight! Don't worry about the queen — you have a bigger plan.
♘︎xe5 — The brilliant queen sacrifice! White moves the pinned knight, deliberately offering the queen on d1. This looks like a terrible blunder, but it's actually a forced checkmate in two moves if Black takes the queen. The key: after ♗︎xd1, White plays ♗︎xf7+ ♔︎e7 ♘︎d5# — the knights and bishop weave an inescapable mating net.
Alternative Moves
The fatal mistake! Black grabs the queen, thinking they've won massive material. But by capturing on d1, Black removes the bishop from the kingside — exactly what White wanted. The correct defense was 5. ..dxe5, simply recapturing the knight. White would win the bishop with ♕︎xg4, but Black stays in the game.
Capture on f7 with check — the king has nowhere safe to go.
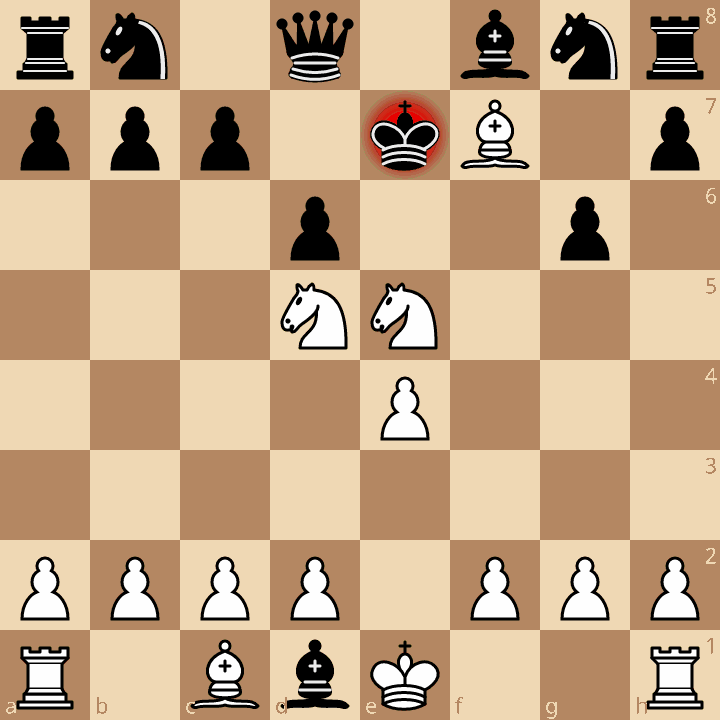
♗︎xf7+ — Check! The bishop captures the weakened f7 pawn, forcing the king to move. The f7 square — defended only by the king — was the target from the moment White played ♗︎c4. The king must go to e7. The knight on e5 covers d7 and f7, and f8 is blocked by Black's own bishop.
Forced — the only legal move. The king steps into the center, walking directly into the mating net. With d8 blocked by the queen, f8 by the bishop, and e8 covered by ♗︎f7, the king has no safe haven.
Bring your knight to the center for the final blow.
Checkmate! The knight lands on d5 with devastating effect. Every escape square is sealed: ♘︎d5 gives check and covers f6, ♘︎e5 covers d7 and f7, ♗︎f7 covers e6 and e8, and Black's own pieces block d8 (queen), f8 (bishop), and d6 (pawn). A spectacular finish — White delivered checkmate with two knights and a bishop, having sacrificed the queen!
Key Takeaways
- Never grab material without checking for tactical consequences first
- A queen sacrifice can be devastating when it opens mating lines
- The f7 square (f2 for White) is a natural target — only the king defends it initially
- Pinning pieces can backfire if the pinned piece has a surprise sacrifice
- Piece coordination (two knights + bishop) can overpower a queen advantage
Now play it through
Step through every move on a real board, try the wrong ones, and ask Knighty why they fail.
Related Lessons
Summary
Ready to Practice?
Next in this opening family
Philidor Defense - Exchange Variation
Take this lesson with you
Free account requiredWith every variation — opens in Lichess & ChessBase