
Four Knights Game - Spanish Variation
A symmetrical opening where both sides develop knights early, leading to rich positional play with the bishop pair.
Try Interactive LessonIntroduction
Lesson Content
Start by controlling the center with your king pawn.
e4 — The King's Pawn opening — White claims the center and opens diagonals for the queen and kingside bishop. The most popular first move in chess. Black's main responses: - 1. ..e5 — Open Game, matching White's center - 1. ..c5 — Sicilian Defense, fighting for d4 asymmetrically - 1. ..e6 — French Defense, preparing ..d5 - 1. ..c6 — Caro-Kann, also preparing ..d5
Alternative Moves
Black mirrors White's central claim, establishing a symmetrical pawn center. This leads to the Open Games — the oldest and most classical family of openings. The e5 pawn controls d4 and f4, limiting White's expansion options.
Develop your knight toward the center while attacking the e5 pawn.
♘︎f3 — White develops the knight to its most natural square, attacking the e5 pawn immediately. The knight also controls d4 and prepares kingside castling. This is the most common second move, leading to a vast tree of openings including the Italian, Ruy Lopez, and Scotch.
Black defends the e5 pawn with the most natural developing move. The knight on c6 also controls the important d4 and e5 squares. From here White's third move defines the opening: - 3. ♗︎c4 — Italian Game - 3. ♗︎b5 — Ruy Lopez - 3. d4 — Scotch Game - 3. ♘︎c3 — Three Knights Game (Four Knights after 3. ..♘︎f6)
Develop your other knight to mirror Black's setup.
♘︎c3 — White develops the second knight symmetrically, entering the Four Knights Game (ECO C47). Rather than committing a bishop immediately, White reinforces control of d5 and e4 while keeping options open. This is a flexible choice — White delays the bishop development to see how Black responds: - 3. ..♘︎f6 — the pure Four Knights - 3. ..♗︎b4 — a Nimzo-like setup - 3. ..g6 — a kingside fianchetto setup
Alternative Moves
Black completes the symmetry — all four knights are developed. This is the defining position of the Four Knights Game. Black attacks e4 while developing naturally. The position is one of the most balanced in opening theory, with 17,000+ master games from this exact setup.
Pressure the knight that defends the e5 pawn, just like in the Ruy Lopez.
♗︎b5 — The Spanish Variation — White puts pressure on the ♘︎c6, echoing the Ruy Lopez idea within the Four Knights framework. This is the most popular choice at master level (7,000+ games, avg rating 2409). White's alternatives lead to distinct variations: - 4. d4 — Scotch Four Knights, immediately opening the center - 4. g3 — Glek System, a hypermodern approach - 4. ♗︎c4 — Italian Four Knights, targeting f7
Alternative Moves
The Double Spanish! Black mirrors White's bishop placement, creating maximum symmetry. Both bishops pressure the opposing knight — ♗︎b4 targets ♘︎c3 and ♗︎b5 targets ♘︎c6 — though the d-pawns currently block a direct pin to either king. Black's key alternatives: - 4. ..♘︎d4 — the Rubinstein Variation, an aggressive pawn sacrifice - 4. ..♗︎c5 — Classical Variation, avoiding the symmetrical tension - 4. ..♗︎d6 — a modern try favored by Carlsen as Black
Alternative Moves
Secure your king before the position opens up.
O-O — White castles early, securing the king and activating the rook. With the symmetrical pawn structure, there is no rush to create tension — safe development comes first. Castling also sets a subtle trap: if Black delays castling, White may open the center with d4 later.
Alternative Moves
Black mirrors again — both kings are now safe. The position remains remarkably symmetrical with all pieces developed identically. The real battle begins with pawn breaks and piece maneuvers.
Support your center pawn and open a diagonal for the bishop.
A modest but important pawn move. White supports the e4 pawn and opens the diagonal for the dark-squared bishop while keeping the position flexible. Unlike 6. d4 which would immediately open the center, 6. d3 allows White to choose the right moment to break. The bishop on c1 remains free to develop to g5, e3, or even a3.
Alternative Moves
Black matches White's setup again — the Symmetrical Variation (ECO C49). Both sides have the same pawn structure: e4/e5 with d3/d6. This is the highest level of symmetry in the Four Knights. The question now is: who breaks the symmetry first, and how?
Pin the knight to the queen with your bishop.
♗︎g5 — White breaks the symmetry! The bishop pins the ♘︎f6 to the queen, creating concrete pressure. This is the most popular way to fight for an advantage in the Symmetrical Variation (1,025 master games). The pin forces Black into a strategic decision: trade the bishop for the knight (giving White the bishop pair) or break the pin with a retreat.
Alternative Moves
Black trades bishop for knight — the most popular response (872 games). This is a critical strategic exchange: Black gives up the bishop pair but doubles White's c-pawns, creating a lasting structural weakness. The resulting imbalance — White's bishops vs Black's better pawn structure — defines the rest of the game.
Alternative Moves
Recapture toward the center to control more squares.
bxc3 — Recapturing with the b-pawn toward the center. White accepts doubled c-pawns but gains the half-open b-file and maintains the bishop pair — a classic Nimzo-Indian type trade-off. The doubled pawn on c3 controls d4, helping White push d4 later. The bishop pair can become powerful in the middlegame.
The Metger Unpin — Black slides the queen to e7, breaking the pin on the ♘︎f6. Named after Johannes Metger, this is the main theoretical continuation. The queen on e7 also supports a future ..♘︎d8-e6 maneuver and keeps an eye on the kingside.
Alternative Moves
Centralize your rook to support the e4 pawn and prepare the central break.
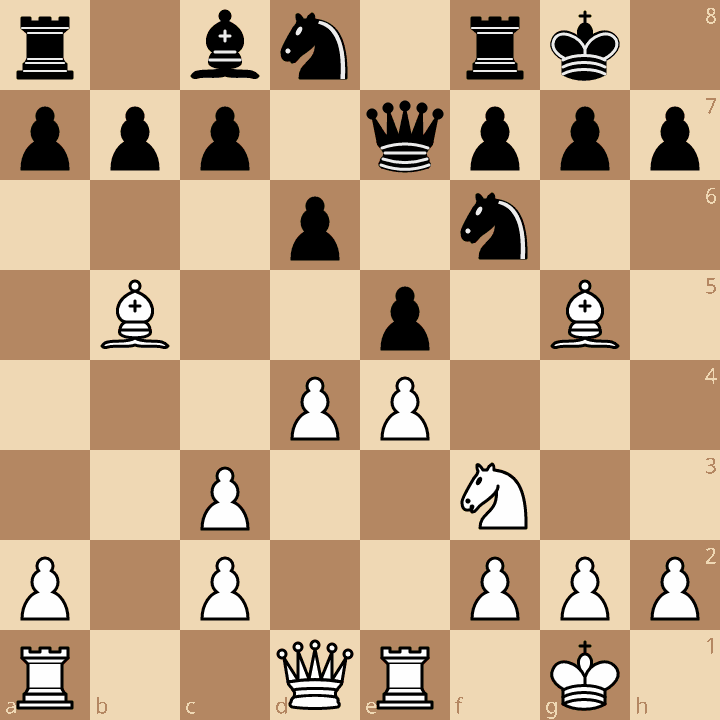
♖︎e1 — The rook centralizes on the e-file, supporting the e4 pawn and eying Black's queen on e7. If the center opens with d4, the rook will exert pressure down the e-file. This is the most popular master choice (622 of 762 games), preparing the central break while maintaining flexibility.
Alternative Moves
A paradoxical retreat — the knight steps back to reroute via e6 or f7, where it can defend the kingside and control key central squares. This maneuver is standard in the Four Knights and shows deep positional understanding. The knight was passive on c6 with the bishop gone from b4; ♘︎d8 begins its journey to a better square.
Open the center now that your pieces are optimally placed.
The central break! With the rook supporting on e1, White pushes d4 to open the position — exactly when the bishop pair can shine in open lines. This is the culmination of White's strategy: patient development followed by a well-timed pawn break. Played in 533 of 541 master games from this position. White's bishops are ready to dominate the resulting open position.
Alternative Moves
Key Takeaways
- Symmetrical development leads to balanced but rich positions
- ♗︎g5 breaks the symmetry by forcing the bishop-for-knight trade
- White accepts doubled c-pawns for the bishop pair — a classic imbalance
- The Metger Unpin (♕︎e7) is the main way Black breaks the pin
- d4 is the key central break, timed after ♖︎e1 supports the e-file
Now play it through
Step through every move on a real board, try the wrong ones, and ask Knighty why they fail.
Related Lessons
Summary
Ready to Practice?
Next in this opening family
Halloween Gambit
Take this lesson with you
Free account requiredWith every variation — opens in Lichess & ChessBase