
Queen vs Rook
Learn the winning technique in Queen vs Rook — use the king march and queen forks to win the rook. One wrong king move throws away the entire win.
Try Interactive LessonIntroduction
Lesson Content
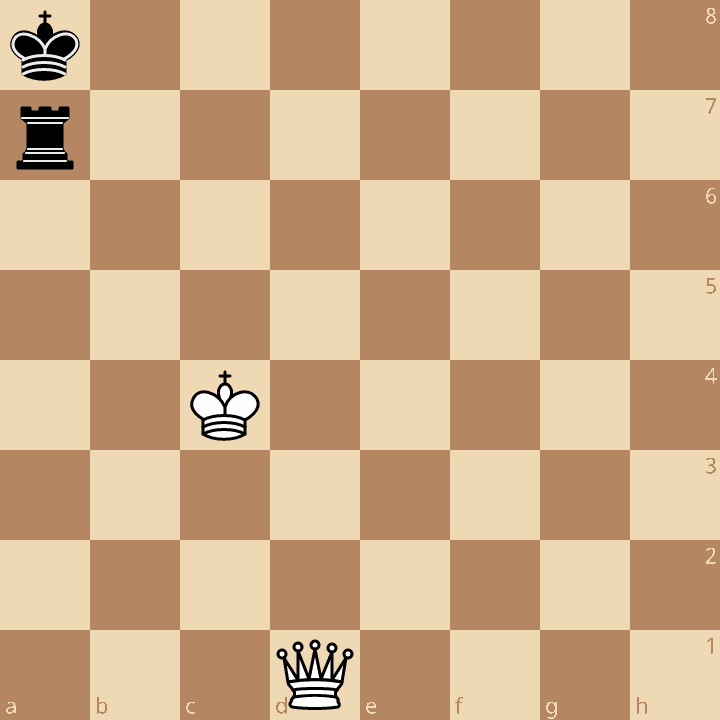
Give check from the back rank to drive the king out of the corner.
♕︎d8+ — Check from the back rank! The queen gives check from d8, forcing the Black king out of the corner. This is the starting move of the winning technique — drive the king to an open file where the queen can later set up a fork. The queen on d8 also controls the entire d-file and 8th rank, severely limiting Black's options.
Alternative Moves
The only legal move. The king steps to b7, forced off the a8 corner by the check. The rook remains on a7, defending the 7th rank — but the king is now exposed in the open.
Advance the king — it needs to help the queen!
♔︎b5 — The king march begins! White's king advances to b5, getting closer to Black's king. This is the key strategic idea in Q vs R: the queen creates threats while the king walks up the board to tighten the net. The king on b5 is perfectly placed — close enough to support the queen's attacks, yet far enough from the rook to avoid immediate threats.
Alternative Moves
Black's best defense — the rook retreats to a1, getting as far as possible from White's pieces. From a1, the rook has maximum distance for future checks along the first rank and the a-file. This is the standard defensive technique: keep the rook far away to generate checking distance.
Centralize the queen with check — separate the king from the rook!
♕︎d5+ — Centralize the queen with check! The queen moves to the powerful d5 square, checking the king and controlling a massive diagonal. From d5, the queen dominates the center and threatens to coordinate with the king on b5 for decisive action. The check forces Black's king further from the rook, which is exactly what White wants — separate king and rook to set up the fork.
Alternative Moves
The king retreats to c8, the best defense. Both ♔︎c8 and ♔︎c7 are equally good, but the key point is that the king is being pushed further away from the rook on a1. The separation between king and rook grows with every move — exactly White's plan.
Keep advancing the king — it must support the queen!
The king keeps marching! ♔︎b6 continues the advance, getting the king to the 6th rank. The king and queen are now working as a team — the queen controls the center from d5 while the king closes in on the Black king. This is the critical moment where precision matters most. The wrong king move throws away everything.
Alternative Moves
Black fights back with a check! The rook swings to b1, checking the White king from the first rank. This is the standard defensive resource in Q vs R — use the rook's checking distance to harass the advancing king. White must handle these checks carefully.
Walk toward the enemy king — use the check as a stepping stone!
♔︎c6 — Step forward into the check! Rather than retreating, the king advances to c6, moving closer to the Black king. Each rook check actually helps White — the king uses the checks as stepping stones to advance further up the board. This counter-intuitive idea is the hallmark of the Q vs R winning technique: don't run from rook checks — walk toward the enemy king.
Another check on the c-file. The rook follows the king, but it's running out of useful checking squares. Each check pushes the White king one file closer to the Black king — the opposite of what Black wants.
Keep advancing — the rook checks are helping you!
♔︎d6 — One more step forward! The king reaches d6, now just two ranks from the Black king on c8. The queen on d5 and king on d6 form a devastating team. Black's rook checks are exhausted — the king has walked through all of them. The stage is set for the decisive queen maneuver.
Alternative Moves
The rook retreats to a1, out of ideas. With the White king on d6 and queen on d5, there are no useful checks left. Black's rook can only wait — and that's when the fork comes.
Set up the fork — check from g8!
♕︎g8+ — The decisive check! The queen leaps to g8 with check, forcing the Black king to move. This isn't just any check — it's the setup for the game-winning fork. After the forced ♔︎b7, ♕︎g7+ forks king and rook along the 7th rank and the a1-h8 diagonal. This is the fork technique that makes Q vs R a forced win: the queen's ability to attack along multiple lines simultaneously means the rook can never hide.
Alternative Moves
The only legal move — the king must go to b7. But now the king and rook are fatally placed: the king is on b7 and the rook is on a1. The queen can exploit this with a check that simultaneously attacks both pieces.
Fork the king and rook — the queen attacks both!
The fork! ♕︎g7+ checks the king on b7 along the 7th rank AND attacks the rook on a1 along the long a1-h8 diagonal. This is the culmination of the entire strategy — the king march forced Black's king and rook onto vulnerable squares, and now the queen strikes both at once. Black must move the king out of check, and the rook falls next move.
The king steps to a6, escaping the check. ♔︎a6 and ♔︎b6 are equally good defense, but it doesn't matter — the rook on a1 is lost regardless. The queen's fork cannot be parried.
Take the rook — the fork worked!
♕︎xa1+ — The rook falls! The queen captures on a1 with check, winning Black's only piece. The resulting Queen + King vs lone King is a basic checkmate covered in the "King & Queen vs King" lesson. The entire winning technique worked in three phases: (1) activate the queen with checks, (2) march the king forward through Black's rook checks, (3) use the queen to fork king and rook. This pattern repeats in every Q vs R endgame — the king must help the queen, and the fork is always the finishing blow.
Key Takeaways
- Queen vs Rook is a theoretical win, but the king must help — the queen cannot win alone
- March the king forward through rook checks — use them as stepping stones, not reasons to retreat
- The winning blow is always a queen fork: check the king while simultaneously attacking the rook
- Watch for drawing traps — wrong king moves (like ♔︎c5 in this game) can throw away the entire win
- After winning the rook, use the box method from K+Q vs K to deliver checkmate
Now play it through
Step through every move on a real board, try the wrong ones, and ask Knighty why they fail.
Related Lessons
Summary
Ready to Practice?
Next in this course
Lucena Position
Take this lesson with you
Free account requiredWith every variation — opens in Lichess & ChessBase