
Lucena Position
Learn the most important rook endgame winning technique — building a bridge with the rook to escort the pawn to promotion.
Try Interactive LessonIntroduction
Lesson Content
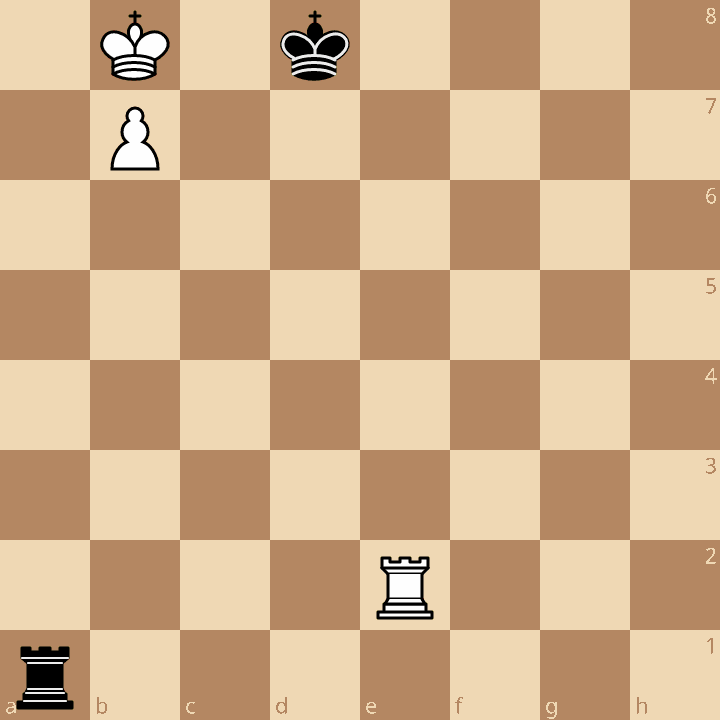
Place the rook on the 4th rank — it's the foundation of the bridge.
♖︎e4 — The first step of the bridge! The rook moves to the 4th rank. This seemingly quiet move is the key to the entire Lucena technique. From e4, the rook serves two purposes: it can later shift to the b-file to block checks, and it can give a check to drive Black's king away. The rook on the 4th rank is far enough from the back rank to provide a useful interposition later, but close enough to remain active.
Alternative Moves
Black's best defense — the king stays near the pawn to prevent White from stepping aside. From d7, the Black king controls c8 and c7, keeping the White king trapped on b8. But White has a way to drive the king back.
Give check to push the defending king away!
♖︎d4+ — Drive the king away! The rook swings to d4 with check, forcing Black's king to retreat. This is a critical intermediate step — by pushing the king back, White creates room to escape from b8. The further the king retreats, the less it can interfere with White's plan.
Black retreats to e6, staying as close as possible. This is the best defense — ♔︎e7 and ♔︎c6 lose faster. From e6, the king no longer controls c7 or c8, which means White's king can finally escape from b8.
Step aside — the promotion square is clear!
♔︎c7 — The king escapes! With Black's king driven to e6, White steps to c7 — clearing the promotion square b8. The pawn now threatens to promote. But Black has a defensive resource: rook checks from the c-file.
Alternative Moves
The check from behind! This is Black's main defensive idea — the rook gives check along the c-file, trying to prevent the king from reaching a safe square. If White's king has nowhere to hide from the checks, the pawn can never promote. This is exactly why the bridge technique exists.
Walk toward the checks — the bridge will shield you soon!
♔︎b6 — White marches the king toward the checking rook. This is counterintuitive but essential — the closer the king gets to the rook, the fewer checking squares remain. The king is heading down the board, and soon the rook on d4 will be able to interpose.
Alternative Moves
Black repositions the rook, preparing for further defensive moves. The rook retreats from the c-file since the White king has moved past it. Black's plan is to either attack the pawn from behind or keep giving checks.
Build the bridge — move the rook to b4!
♖︎b4 — The bridge is built! The rook moves to b4, completing the Lucena technique. From b4, the rook performs a dual role: it defends the b-file (protecting the pawn's advance) and it stands ready to block any check from behind on the b-file. If Black tries to check from b1, the rook on b4 is already in the way — this is the "bridge" that gives the technique its name.
Black repositions the rook to the 8th rank, preparing to swing to b8 to blockade the pawn. This is the best practical try — by occupying the promotion square next move, Black forces White to find a way past the blockade. But White's king and rook are perfectly coordinated to push the pawn through.
Step aside — clear the b-file for your rook!
♔︎c6 — White's king steps to c6, still guarding the pawn. The king no longer blocks the b-file, so the rook on b4 can back up the pawn from behind. The pawn is ready to advance to b8.
Black plants the rook directly on b8, physically blocking the promotion square. This forces White to deal with the blockade before the pawn can promote.
Support the pawn from behind!
♖︎b5 — The rook advances to b5, defending the pawn on b7 from behind while keeping the bridge structure intact. Now if Black's rook leaves b8, the pawn promotes immediately. Black is in a bind — ♔︎c7 is threatened next, and the rook cannot hold b8.
Black moves the rook off b8 — a concession. With the rook no longer blocking the promotion square, the pawn can advance. Black has run out of defensive resources.
Promote the pawn!
b8=♕︎ — Promotion! The pawn becomes a queen. Even after ♖︎xb8 ♖︎xb8, White is a whole rook up and the position is trivially won. The bridge technique worked perfectly: the rook went to the 4th rank, drove the defending king away, the king escaped, and the rook blocked any interference — building a bridge all the way to promotion.
Key Takeaways
- The Lucena Position arises when you have a pawn on the 7th rank with your king in front — the key challenge is stepping aside without allowing perpetual checks
- Place the rook on the 4th rank first — this is the foundation of the bridge technique
- Drive the defending king away with a rook check before moving your own king
- March your king TOWARD the checking rook, not away — the closer you get, the fewer checking squares remain
- The "bridge" is when your rook interposes to block a check from behind, shielding the king and allowing promotion
Now play it through
Step through every move on a real board, try the wrong ones, and ask Knighty why they fail.
Related Lessons
Summary
Ready to Practice?
Next in this course
Direct Opposition
Take this lesson with you
Free account requiredWith every variation — opens in Lichess & ChessBase