
Alekhine Defense - Modern Variation
Provoke White's pawns forward, then undermine the overextended center
Try Interactive LessonIntroduction
Lesson Content
The King's Pawn opening — White claims the center and opens diagonals for the queen and kingside bishop. The most popular first move in chess. Black's main responses: - 1. ..e5 — Open Game, matching White's center - 1. ..c5 — Sicilian Defense, fighting for d4 asymmetrically - 1. ..e6 — French Defense, preparing ..d5 - 1. ..c6 — Caro-Kann, also preparing ..d5
Attack the e4 pawn with your knight to provoke it forward.
♘︎f6 — The Alekhine Defense! Instead of matching White in the center, Black immediately attacks the e4 pawn with the knight. This is a hypermodern provocation — Black wants White to push 2. e5, gaining space but creating a target. Alexander Alekhine introduced this idea in the 1920s, shocking the classical establishment that believed in occupying the center with pawns.
Alternative Moves
White accepts the challenge, pushing the pawn forward to chase Black's knight. This gains space but commits the pawn to an advanced post where it may become a target. White's alternatives: - 2. ♘︎c3 — Vienna-like, defending e4 calmly - 2. d3 — very passive, giving Black an easy game
Retreat the knight to a strong central square.
♘︎d5 — The knight retreats to d5 — a powerful central square. From d5 the knight eyes c3, b4, and f4. Black's strategy is clear: let White push pawns forward, then attack the overextended center later.
Alternative Moves
White builds the classical pawn center with e5 and d4. This is exactly what Black wanted to provoke — a big center that Black can later target with ..d6 and ..c5. White's alternatives: - 3. c4 — the Four Pawns Attack, even more aggressive - 3. ♘︎c3 — the Sämisch Attack, here with 3. ..♘︎xc3 4. dxc3
Challenge the head of White's pawn chain.
d6 — The key counter-attacking move! Black immediately challenges the e5 pawn, the head of White's pawn chain. By striking at e5, Black begins to undermine the center that White spent time building.
Alternative Moves
White develops the knight to its natural square, defending e5 and preparing to castle. This is the Modern Variation — White develops pieces before deciding on the pawn structure. The main alternative is 4. c4, chasing the knight and leading to the sharper Four Pawns Attack after 4. ..♘︎b6 5. f4.
Pin the knight that defends the e5 pawn.
♗︎g4 — The main line of the Modern Variation! Black pins the f3 knight against the queen, putting immediate pressure on White's position. The bishop also indirectly targets e5 — if the knight moves, e5 falls. This is Black's most active and popular continuation, more dynamic than 4. ..dxe5 or 4. ..g6.
Alternative Moves
White develops the bishop to e2, breaking the pin while preparing to castle. A solid, positional choice. Alternatives: - 5. h3 — immediately asking the bishop's intentions - 5. c4 — chasing the knight before developing
Support your central knight and prepare bishop development.
Black supports the d5 knight and prepares to develop the dark-squared bishop to e7. The pawn on e6 also controls d5, reinforcing Black's central grip. This is a solid setup — Black will castle and then look for the right moment to break with ..dxe5 or ..c5.
Alternative Moves
White castles to safety. The king is secure on g1 before the central tension resolves.
Develop your bishop and prepare to castle.
♗︎e7 — Black develops the bishop to a modest but functional square. On e7 it doesn't block any pawns and prepares kingside castling.
Alternative Moves
White expands on the queenside, kicking the knight from d5. The pawn on c4 also supports d5 control and gives White a broad pawn center. Black must retreat the knight, typically to b6.
Retreat the knight to a square that still influences the center.
♘︎b6 — The knight retreats to b6, maintaining influence on d5 and c4. From b6 the knight can reroute to c8-e7 or d7 later, or stay put to pressure c4. Black's position is compact and solid.
Alternative Moves
White develops the queenside knight, controlling d5. The knight on c3 adds pressure to the center.
Get your king to safety before starting the central battle.
O-O — Black castles to safety. With both sides now castled, the middlegame battle will center around whether White's space advantage is an asset or a liability. Black's next plan is to challenge the center with ..dxe5 or ..d5.
Alternative Moves
White asks the bishop a question: stay, retreat, or trade? The h3 pawn forces a decision and prepares to gain the bishop pair after ♗︎xf3.
Trade the bishop before it gets pushed to a passive square.
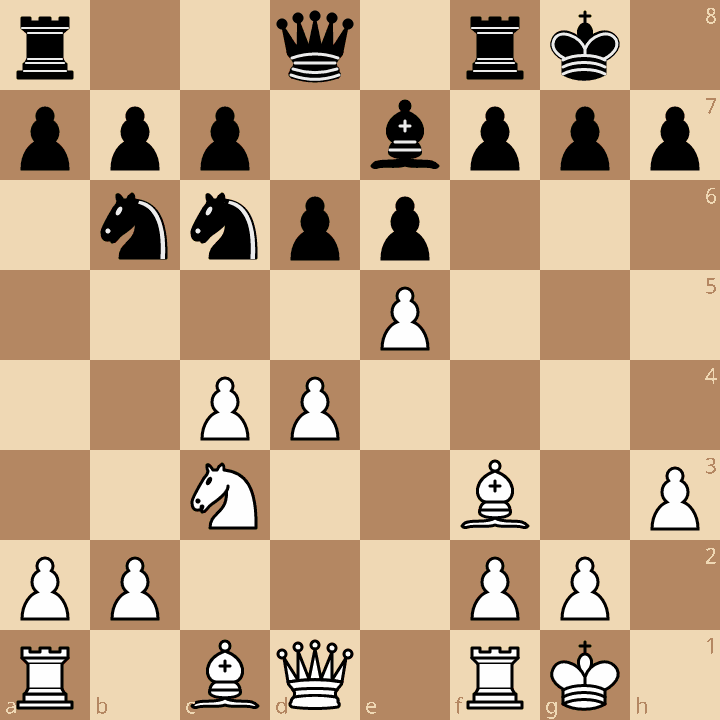
♗︎xf3 — Black trades the bishop for the knight. This concedes the bishop pair but removes the key defender of e5. Black's position remains solid with a clear plan to attack the center.
Alternative Moves
White recaptures with the bishop, maintaining the pawn structure. The bishop on f3 is well-placed, controlling the long diagonal and supporting e4/d5 ideas.
Develop your last piece to pressure White's center.
♘︎c6 — Black develops the last minor piece, pressuring d4 and e5. The knight on c6 completes development and prepares for the central battle. Black can now aim for ..dxe5 or ..f6 to challenge White's space advantage.
Alternative Moves
Key Takeaways
- 1...♘︎f6 provokes White's pawn to e5 — a hypermodern strategy
- Black lets White build a center, then attacks it with ...d6
- 4...♗︎g4 pins the knight defending e5 — the most active plan
- Trade the bishop for the knight when challenged by h3
- Black's compact setup is solid — the central battle comes later
Now play it through
Step through every move on a real board, try the wrong ones, and ask Knighty why they fail.
Related Lessons
Summary
Ready to Practice?
Take this lesson with you
Free account requiredWith every variation — opens in Lichess & ChessBase