
Bird's Opening - Classical Setup
A flank opening where White controls e5 with f4 and builds a harmonious setup with ♘︎f3, b3, ♗︎b2, and ♗︎e2
Try Interactive LessonIntroduction
Lesson Content
Control the e5 square with your f-pawn.
f4 — Bird's Opening — White immediately claims control of the e5 square with the f-pawn. This is the mirror of Black's Dutch Defense (1. ..f5), but with the advantage of moving first. Black's main responses: - 1. ..d5 — the most natural, claiming the center - 1. ..e5 — From's Gambit, a sharp counterattack
Alternative Moves
Black claims the center immediately — the most popular and principled response. While White took a flank pawn, Black seizes the center directly with d5, controlling e4 and c4.
Alternative Moves
Develop your knight to support the e5 square.
♘︎f3 — White develops the knight to its best square, reinforcing control of e5 and preparing kingside castling. The knight on f3 is the backbone of the Bird's formation, working with the f4 pawn to dominate the dark squares.
Alternative Moves
Black develops naturally, counterattacking e4 and preparing to castle. The knight on f6 also controls d5, reinforcing Black's central presence.
Support your f4 pawn and open a diagonal for your bishop.
Supporting the f4 pawn and opening the diagonal for the light-squared bishop. The f4/e3 pawn chain is the classic Bird's structure — solid and flexible. This is the Lasker Variation, named after Emanuel Lasker. White keeps a modest but stable center.
Alternative Moves
Black builds a solid pawn chain with d5/e6, similar to the French Defense structure. The light-squared bishop is temporarily blocked, but Black plans ..♗︎e7, ...O-O, and ..b6/♗︎b7 for a flexible setup.
Prepare to fianchetto your dark-squared bishop.
Preparing the queenside fianchetto — the dark-squared bishop will go to b2, commanding the long a1-h8 diagonal. Combined with the f4 pawn, this creates a powerful dark-square grip. The b3/♗︎b2 setup is the hallmark of the classical Bird.
Alternative Moves
Black develops the bishop to a solid, flexible square and prepares to castle. ♗︎e7 doesn't commit to an aggressive diagonal yet, keeping options open for later.
Complete the fianchetto on the long diagonal.
♗︎b2 — The dark-squared bishop fianchettoes to b2, commanding the long diagonal from a1 to h8. Together with the f4 pawn and ♘︎f3, White now has a powerful dark-square grip across the board.
Alternative Moves
Black castles to safety. The king is secure and the rook moves to f8, potentially supporting a future ..f5 break if needed.
Develop your remaining bishop.
♗︎e2 — The light-squared bishop develops to a flexible square. From e2 it can later relocate to f3 to pressure d5 and support the center. White's minor pieces are nearly all developed.
Alternative Moves
Black prepares a queenside fianchetto of their own. The bishop will go to b7, creating a symmetrical fianchetto pattern — both sides commanding their respective long diagonals.
Castle to safety before starting active operations.
O-O — White castles kingside, securing the king. The f1-rook now eyes the f-file, which could open in the middlegame. White's development is nearly complete.
Alternative Moves
Black completes the fianchetto. The bishop on b7 controls the long light-square diagonal, creating a symmetrical fianchetto pattern with both sides' bishops working on their respective diagonals.
Occupy the strong e5 outpost supported by your f-pawn.
♘︎e5 — The key Bird's maneuver! The knight occupies the powerful e5 outpost, permanently supported by the f4 pawn. From e5, the knight radiates influence across the board — attacking d7, f7, c6, and g6. This is the strategic payoff of 1. f4.
Alternative Moves
Black expands on the queenside, gaining space and preparing to challenge the center. The c5 pawn also supports a future ..d4 break if White plays passively.
Reposition your bishop to pressure d5.
The bishop relocates to f3, pressuring the d5 pawn and opposing the ♗︎b7 on the long diagonal. ♗︎f3 and ♘︎e5 together create a strong central presence — the bishop and knight work together to dominate the light and dark squares.
Alternative Moves
Black develops the last minor piece, reinforcing the center and challenging White's powerful knight on e5.
Centralize your queen.
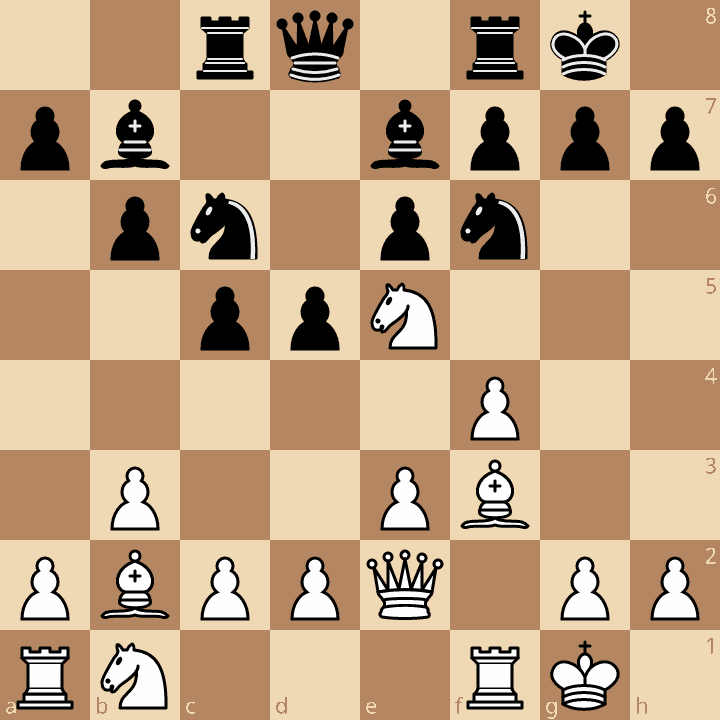
♕︎e2 — The queen centralizes on e2, supporting both flanks. From e2, the queen can shift to the kingside for an attack or stay centralized for positional play. White's position is a model Bird's setup — its pieces harmoniously placed.
Alternative Moves
Black brings the rook to the c-file behind the c5 pawn, completing development. The position is roughly balanced — White has the e5 outpost and dark-square control, while Black has central pawns and queenside activity.
Key Takeaways
- 1.f4 controls the e5 square — the mirror of Black's Dutch Defense
- b3 + ♗︎b2 fianchettoes the dark-squared bishop on the long diagonal
- ♘︎e5 is the key maneuver — the f4 pawn creates a permanent outpost
- ♗︎f3 pressures d5 and coordinates with the ♘︎e5 knight
- Complete development before starting active operations
Now play it through
Step through every move on a real board, try the wrong ones, and ask Knighty why they fail.
Related Lessons
Summary
Ready to Practice?
Take this lesson with you
Free account requiredWith every variation — opens in Lichess & ChessBase