
Blackmar-Diemer Gambit
White sacrifices a pawn with 2.e4 and 4.f3 for rapid development, open lines, and a fierce kingside attack against an unprepared opponent.
Try Interactive LessonIntroduction
Lesson Content
Claim the center with your queen pawn.
d4 — The Queen's Pawn opening — White claims the center with the d-pawn, which is immediately defended by the queen. This tends to lead to more strategic, closed positions compared to 1. e4. Black's main responses: - 1. ..d5 — Queen's Gambit and Slav setups - 1. ..♘︎f6 — Indian Defenses (King's Indian, Nimzo-Indian, etc.) - 1. ..f5 — Dutch Defense
Black matches White in the center, leading to the Queen's Pawn Game. The symmetrical center typically results in strategic maneuvering rather than immediate tactical battles. White's most popular continuation is 2. c4 — the Queen's Gambit.
Offer the pawn to open the center aggressively.
e4 — The Blackmar-Diemer Gambit begins! White boldly offers the e-pawn to blast open the center. If Black captures, White will follow up with f3 to sacrifice a second pawn for overwhelming development. White's alternatives here lead to very different openings: - 2. c4 — the Queen's Gambit, the classical approach - 2. ♘︎f3 — a quiet, flexible development - 2. ♗︎f4 — the London System
Alternative Moves
Black accepts the gambit, capturing the e4 pawn. This is the most critical response — declining with 2. ..e6 would transpose to a French Defense structure, and 2. ..♘︎f6 allows 3. e5. Now White must follow through with the gambit plan by playing ♘︎c3 and f3 to recover the pawn or gain compensation.
Develop the knight before pushing f3.
White develops the knight to its best square, supporting the upcoming f3 push. The ♘︎c3 also eyes the e4 pawn and prepares to recapture on f3 if needed. This is the Blackmar move order — after 3. ♘︎c3, White is committed to the gambit approach with f3.
Alternative Moves
Black develops the knight to its most natural square, defending the extra e4 pawn and preparing to castle. This is the main line — Black defends the pawn while developing. Other options like 3. ..♗︎f5 or 3. ..e5 are playable but less common.
Sacrifice the second pawn to half-open the f-file.
f3 — The defining move of the Blackmar-Diemer Gambit! White offers a second pawn to half-open the f-file and accelerate development. After Black captures, White recaptures with the knight, gaining a tempo and a powerful position. This is the moment of truth — White commits fully to the gambit in exchange for open lines and rapid development.
Alternative Moves
Black captures the second pawn, going up a full pawn in material. However, this half-opens the f-file for White's rook and allows ♘︎xf3 with tempo. Declining with 4. ..e3 is possible but passive — it blocks Black's own development and doesn't challenge White's plan.
Recapture with the knight to complete the gambit.
♘︎xf3 — White recaptures with the knight, completing the gambit. Look at the position: White has two knights developed and the f-file is half-open, while Black has only one knight out. This development lead is the BDG's compensation for the sacrificed pawn. The queen and both bishops are ready to develop to active squares, and the rook will soon control the f-file.
The Gunderam (Tartakower) Defense — Black develops the bishop to an active square outside the pawn chain. This is one of the most popular responses, aiming to trade pieces and neutralize White's initiative. Black's alternatives lead to different defensive systems: - 5. ..g6 — Bogoljubov Defense, fianchettoing the bishop - 5. ..e6 — Euwe Defense, solid but passive
Challenge the bishop and prepare to centralize your queen.
♗︎d3 — White develops the bishop to d3, challenging Black's active bishop immediately. If Black trades on d3, White recaptures with the queen, centralizing it on a powerful square that eyes both the kingside and the center. This is a key idea: the bishop trade actually helps White by activating the queen.
Alternative Moves
Black trades the bishop, which is practically forced — retreating with ..♗︎g6 allows White to play ♘︎e5 with a strong outpost. After the trade, White's queen comes to d3 with a commanding view of the board. The trade eliminates Black's most active piece, tilting the dynamic balance toward White.
Recapture with the queen to centralize it.
♕︎xd3 — The queen recaptures on d3, occupying a powerful central square. From d3, the queen supports d4, eyes the kingside (especially h7), and can swing to the attack. White's development advantage is now clear — queen, two knights, and a half-open f-file versus Black's lone knight. White's plan: complete development with ♗︎g5 and O-O-O, then attack down the half-open files.
Black shores up the queenside and prepares ..♘︎bd7 followed by ..♗︎e7 and castling. The c6 pawn also prevents ♘︎b5 tricks targeting d6 or c7. Black's priority is completing development and castling to safety before White's initiative becomes too strong.
Pin the knight and build pressure on the kingside.
♗︎g5 — White develops the last minor piece with a pin on the ♘︎f6. The bishop on g5 creates immediate pressure — the knight is an important defender of the kingside, and pinning it restricts Black's options. Combined with the centralized queen and half-open f-file, White's pieces are coordinating for an attack.
Alternative Moves
Black plays ..e6 to develop the bishop and prepare castling. The pawn on e6 solidifies the center but blocks the light-squared bishop's diagonal — though Black already traded that bishop, so it's not a drawback here. Black is close to completing development but still needs to castle.
Castle queenside to activate the rook on the d-file.
O-O-O — White castles queenside, immediately placing the rook on the d-file behind the d4 pawn. This is the classic BDG setup — the king is safe on the queenside while the rooks are ready to attack. The d1 rook backs up the d4 pawn, and the h1 rook can join via the f-file or g-file. Castling queenside also opens the possibility of a kingside pawn storm if needed.
Black develops the last minor piece, preparing to castle kingside with ..♗︎e7 and ...O-O. The knight on d7 supports the ♘︎f6 (which is pressured by the ♗︎g5) and prepares potential ..♘︎b6 or ..♘︎c5 maneuvers. Black is one or two moves from completing development, but White's initiative is already well established.
Secure the king before intensifying the attack.
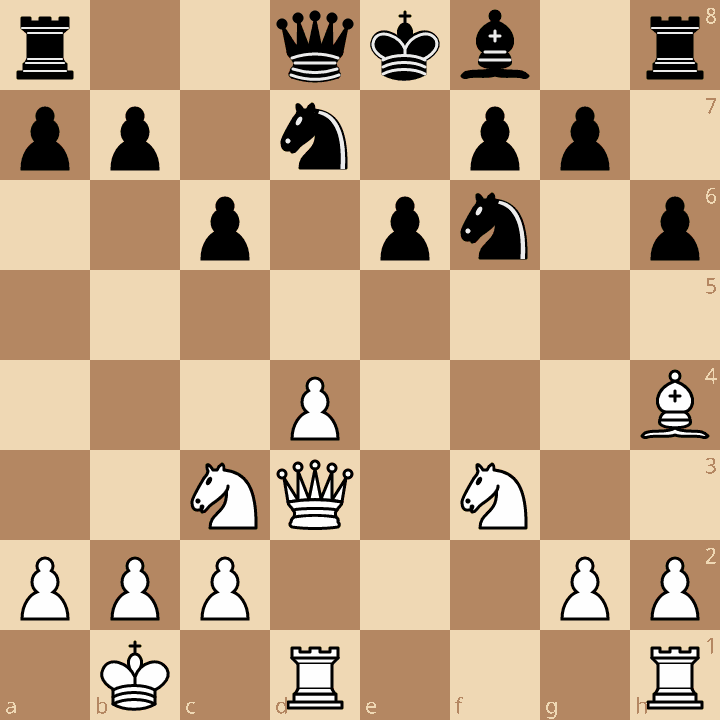
A prophylactic king move, tucking the king into the corner before launching the attack. ♔︎b1 removes the king from the c1-h6 diagonal and any potential ..♕︎a5 or ..♗︎b4 tactics targeting c2. With the king safe, White is free to focus entirely on the attack. The rooks are connected and ready to double on the d-file or shift to the kingside.
Alternative Moves
Black challenges the bishop on g5, asking it to declare its intentions. This creates a slight kingside weakness but is practically necessary — leaving the pin on ♘︎f6 would make development uncomfortable. If the bishop retreats to h4, the pin along the h4-d8 diagonal continues.
Retreat the bishop while maintaining pressure on the knight.
♗︎h4 — The bishop retreats to h4, maintaining pressure along the h4-d8 diagonal. The ♘︎f6 remains under scrutiny, and White preserves the option of ♗︎xf6 at the right moment to damage Black's pawn structure or deflect a key defender. White's position is ideal: fully developed, king safe on b1, both rooks active, and pieces aimed at Black's still-uncastled king. The gambit pawn has been well invested.
Alternative Moves
Key Takeaways
- The double pawn sacrifice (2.e4 and 4.f3) is the heart of the BDG — trading material for a massive development lead
- After 5.♘︎xf3, White has three pieces ready to develop while Black has only a knight — this tempo advantage is the gambit's compensation
- ♗︎d3 forces a bishop trade that opens the queen to an active square on d3, centralizing and eyeing the kingside
- ♗︎g5 pins or pressures the ♘︎f6, a key defender, while O-O-O puts the rook on the d-file behind the d4 pawn
- ♔︎b1 is a prophylactic move that removes the king from potential tactics on the c-file before continuing the attack
Now play it through
Step through every move on a real board, try the wrong ones, and ask Knighty why they fail.
Related Lessons
Summary
Ready to Practice?
Next in this opening family
Albin Counter-Gambit - Fianchetto Line
Take this lesson with you
Free account requiredWith every variation — opens in Lichess & ChessBase