
Halloween Gambit
A shocking knight sacrifice in the Four Knights Game — White gives up a piece for a massive pawn center and rapid development.
Try Interactive LessonIntroduction
Lesson Content
Start by controlling the center with your king pawn.
e4 — The King's Pawn opening — White claims the center and opens diagonals for the queen and kingside bishop. The most popular first move in chess. Black's main responses: - 1. ..e5 — Open Game, matching White's center - 1. ..c5 — Sicilian Defense, fighting for d4 asymmetrically - 1. ..e6 — French Defense, preparing ..d5 - 1. ..c6 — Caro-Kann, also preparing ..d5
Black mirrors White's central claim, establishing a symmetrical pawn center. This leads to the Open Games — the oldest and most classical family of openings. The e5 pawn controls d4 and f4, limiting White's expansion options.
Develop a piece that attacks the e5 pawn.
♘︎f3 — White develops the knight to its most natural square, attacking the e5 pawn immediately. The knight also controls d4 and prepares kingside castling. This is the most common second move, leading to a vast tree of openings including the Italian, ♖︎uy Lopez, and Scotch.
Black defends the e5 pawn with the most natural developing move. The knight on c6 also controls the important d4 and e5 squares. From here White's third move defines the opening: - 3. ♗︎c4 — Italian Game - 3. ♗︎b5 — Ruy Lopez - 3. d4 — Scotch Game - 3. ♘︎c3 — Three/Four Knights
Develop your second knight to prepare the gambit.
White develops the second knight, entering the Four Knights Game. This looks like a quiet, symmetrical setup — but White is actually preparing a shocking sacrifice on the next move. The ♘︎c3 develops naturally while keeping the option for the Halloween Gambit's ♘︎xe5 surprise.
Alternative Moves
Black completes the symmetrical Four Knights setup, counterattacking the e4 pawn. This is the most natural reply. Black has no reason to suspect danger — the position looks completely equal and routine. The Halloween Gambit's surprise factor is about to be unleashed.
Sacrifice the knight to seize the center!
♘︎xe5 — The Halloween Gambit! White sacrifices a full knight for a pawn. This looks insane — but the idea is profound. After Black recaptures, White plays d4 and e5, building a massive pawn center that pushes Black's knights back to passive squares. The gambit banks on rapid development and central space to compensate for the material deficit.
Alternative Moves
Black captures the knight — the only principled response. Declining with moves like 4. ..♘︎xe4 allows White to get a strong position after 5. ♕︎h5 threatening ♕︎xf7+. Now White's plan becomes clear: push the d- and e-pawns forward to dominate the center and drive Black's pieces back.
Alternative Moves
Attack the knight and seize the center with your d-pawn.
The whole point — White immediately attacks the knight and claims the center. The d4 pawn together with e4 creates an imposing pawn duo. Black's knight must retreat, and White is already threatening to push e5 with tempo. White has sacrificed a knight but gained a move and a dominating pawn center.
Alternative Moves
The knight retreats to g6 — the best square available. From g6 it watches over e5 and f4, trying to blockade White's advancing pawns. Black could also try 5. ..♘︎c6, but it allows d5 with a strong central wedge. The knight on g6 is passive but safe.
Alternative Moves
Push the e-pawn to attack the knight and dominate the center.
The second pawn thrust! White now has pawns on d4 and e5 — a dream center controlling all the key squares. The e5 pawn attacks the ♘︎f6, forcing it to retreat as well. Both of Black's knights are being driven backward. This is the Halloween Gambit's core idea: the pawns do the work of the sacrificed knight.
Remarkable — Black's knight retreats all the way to g8! After just 6 moves, both of Black's knights have been pushed back to their starting area. This is the Halloween Gambit's dream scenario. Black is a full piece up but has zero development and a cramped position. White's central pawns are worth more than the knight right now.
Develop your bishop to the most aggressive square.
♗︎c4 — White develops the bishop to c4, targeting the weak f7 square. With the massive pawn center already established, White shifts to rapid piece development. The bishop on c4 is aggressive and creates threats. White aims to complete development quickly before Black can untangle and use the extra piece.
Alternative Moves
Black strikes back at the center with ..d5! This is the most principled response — challenging White's pawn mass and opening lines for the light-squared bishop. Black must act quickly to break up White's center before the development advantage becomes overwhelming.
Alternative Moves
Capture to maintain your central pawn and keep the bishop active.
♗︎xd5 — White captures, maintaining the strong e5 pawn and keeping the bishop active in the center. The bishop on d5 controls key light squares and pressures b7. White doesn't mind trading material — the pawn center and development lead are the real assets.
Black finally starts developing the kingside knight via e7. From e7, the knight can challenge the ♗︎d5 or reroute to f5 to pressure the d4 and e3 squares. Black is slowly untangling, but White still has a big lead in development.
Develop your bishop to create pressure on Black's position.
White develops the bishop with tempo, pinning or pressuring along the h4-d8 diagonal. The ♗︎g5 eyes the e7 knight and makes it harder for Black to castle. With three active pieces against Black's two passive knights, White's compensation for the knight is very real.
Alternative Moves
Black kicks the bishop away from d5 and prepares to develop. The c6 pawn also controls d5, preventing White from planting a piece there. Black is gradually catching up in development, but the position remains uncomfortable due to White's space advantage.
Retreat the bishop to a safe but active diagonal.
♗︎b3 — The bishop retreats to b3, maintaining its diagonal pressure toward f7. From b3, the bishop stays active and out of danger while supporting the center. White preserves all the key assets: the massive d4/e5 pawn center, a development lead, and active piece placement.
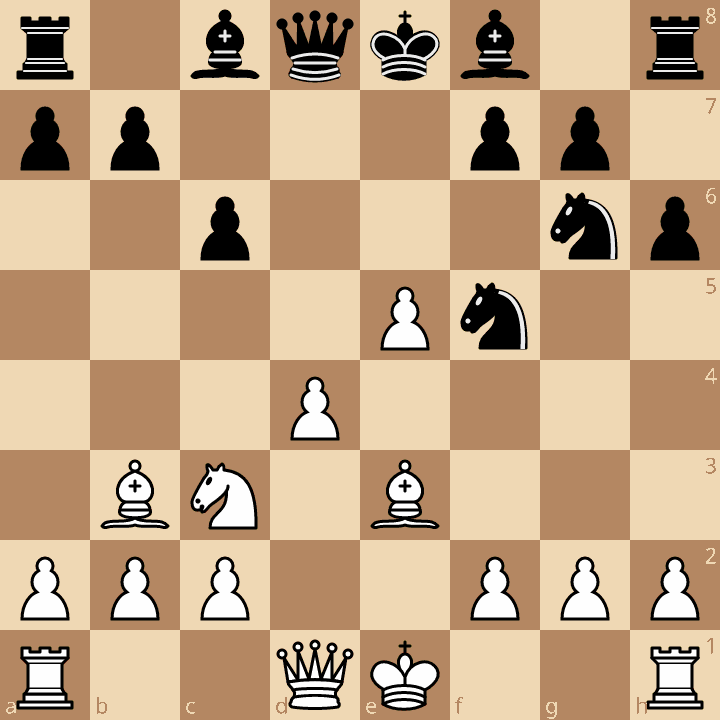
Black asks the ♗︎g5 an important question: stay or retreat? The h6 push also prepares to develop without the annoyance of a pin on the e7 knight. This is a necessary move — Black needs to resolve the tension before castling.
Retreat the bishop to support your central pawns.
♗︎e3 — White retreats the bishop to e3, where it supports the d4 pawn and keeps an eye on the kingside. The bishop is well-placed on e3 — it defends the center and can swing to the attack if needed. White can castle kingside now or queenside later, maintaining flexibility.
Alternative Moves
Black's knight lands on f5 — an excellent outpost attacking d4 and e3. The ♘︎g6 reroutes to a strong central position, and Black is finally generating some counterplay. The position is complex: White has a huge pawn center and development lead, while Black has the extra piece and is starting to coordinate.
Key Takeaways
- 4.♘︎xe5 sacrifices a knight for a massive pawn center
- d4 + e5 drives Black's knights to passive squares
- Development speed is critical — White must attack before Black untangles
- ♗︎c4 targets f7 and accelerates development
- The gambit is objectively unsound but devastating against unprepared opponents
Now play it through
Step through every move on a real board, try the wrong ones, and ask Knighty why they fail.
Related Lessons
Summary
Ready to Practice?
Next in this opening family
Four Knights Game - Spanish Variation
Take this lesson with you
Free account requiredWith every variation — opens in Lichess & ChessBase