
Jobava London
An aggressive twist on the London System — ♘︎c3 replaces ♘︎f3, enabling dynamic piece play and the trademark ♘︎b5 jump.
Try Interactive LessonIntroduction
Lesson Content
Claim the center with your queen pawn.
d4 — White claims the center with the queen's pawn. In the Jobava London, this is followed by the unusual ♘︎c3 and ♗︎f4 setup rather than the standard c4 or ♘︎f3. Black's main responses: - 1. ..♘︎f6 — Indian setups, most common - 1. ..d5 — Queen's Pawn Game, also viable - 1. ..f5 — Dutch Defense
Black develops the knight and controls e4, preventing White from building the ideal e4+d4 center easily. This is the gateway to all Indian Defense systems. Black delays committing a pawn structure, staying flexible to choose between King's Indian, Nimzo-Indian, Queen's Indian, and more.
Develop the knight to support e4 and enable Nb5.
♘︎c3 — The defining move of the Jobava London! Instead of the standard 2. c4 or 2. ♘︎f3, White develops the knight to c3, supporting a future e4 push and enabling the aggressive ♘︎b5 jump. This is more ambitious than the regular London System — the knight on c3 is actively placed but blocks the c-pawn (no c4 break available).
Alternative Moves
Black claims central space and prevents e4. This is the most solid response — establishing a firm d5 pawn limits White's central ambitions. Other options like 2. ..d6 or 2. ..e6 are playable but give White an easier path to e4.
Develop the bishop before playing e3.
The bishop develops to f4 before being locked in by e3 — the same principle as the regular London System. Combined with ♘︎c3, this creates the Jobava London (also known as the ♖︎apport-Jobava System). The ♗︎f4 controls the important e5 and d6 squares, and the bishop is already active outside the pawn chain.
Alternative Moves
Black prepares to fianchetto the bishop on g7, adopting a King's Indian-style setup. The bishop on g7 will be a powerful piece on the long diagonal, pressuring White's center. Other responses include 3. ..e6 (solid, preparing ..♗︎d6) and 3. ..♗︎f5 (developing the bishop actively), but the fianchetto is the most popular approach.
Alternative Moves
Support d4 and prepare to develop the light-squared bishop.
White supports the d4 pawn and opens the diagonal for the light-squared bishop. The bishop on f4 is already developed, so e3 doesn't block anything — this is the whole point of playing ♗︎f4 early. White's setup will be completed with ♘︎f3, ♗︎e2, and O-O.
Alternative Moves
Black completes the fianchetto. The bishop on g7 is a powerful piece — it controls the long diagonal from a1 to h8 and supports both defensive and offensive operations. Black will castle kingside next, reaching a flexible position.
Launch the h-pawn forward to create kingside pressure.
h4 — A trademark Jobava London move! White pushes the h-pawn aggressively, signaling kingside intentions. The threat is h5, which would weaken Black's kingside pawn cover after ..gxh5 or create a wedge after h5 is blocked. This is much more aggressive than the quiet ♘︎f3/♗︎e2 development — White declares early attacking ambitions.
Alternative Moves
Black stops the h-pawn advance immediately. Allowing h5 would weaken the kingside pawn cover significantly — after ..gxh5 the g-file opens dangerously, or if Black ignores it, White gets a strong clamp. The h5 pawn fix means both sides have committed pawns on the h-file, creating a permanent structural feature.
Develop your kingside knight toward the center.
White develops the knight to f3, its third minor piece. The knight controls e5 — a key outpost square — and prepares kingside castling. With ♗︎f4, ♘︎c3, and ♘︎f3 all developed, White has excellent piece coordination.
Alternative Moves
Black castles to safety. Despite the advanced h5 pawn, the kingside is still the safer side for Black's king — the fianchettoed bishop on g7 provides excellent shelter.
Develop the bishop and prepare to castle.
♗︎e2 — The bishop develops to e2, a modest but flexible square. It supports kingside castling and can later reposition to d3 or f3 as needed. White's development is nearly complete — just castling remains.
Alternative Moves
Black strikes at the center with the thematic ..c5 break! This challenges White's d4 pawn and seeks counterplay. If White takes, the d5 pawn becomes a potential target but Black gains piece activity. This is Black's main equalizing idea in many d4 structures — undermining White's central control.
Alternative Moves
Capture the c5 pawn to gain a tempo advantage.
dxc5 — White captures, accepting a structural transformation. The c5 pawn is temporarily won, and Black must spend time recapturing. Meanwhile White's pieces are well-placed and the ♘︎c3 eyes the weakened d5 pawn. The extra pawn won't last, but White gains time and creates imbalance.
Alternative Moves
Black activates the queen with a double attack — threatening the c5 pawn and eyeing the a5-e1 diagonal. The queen is actively placed and will recapture on c5 with tempo. This is stronger than the quiet ..♘︎bd7 recapture since it develops the queen to a useful square.
Castle to safety — the c5 pawn is not the priority.
O-O — White castles, placing the king in safety. The c5 pawn is bait — White is happy to let Black capture it because the real plan is the knight jump to b5. With all minor pieces developed and the king safe, White is ready for active operations.
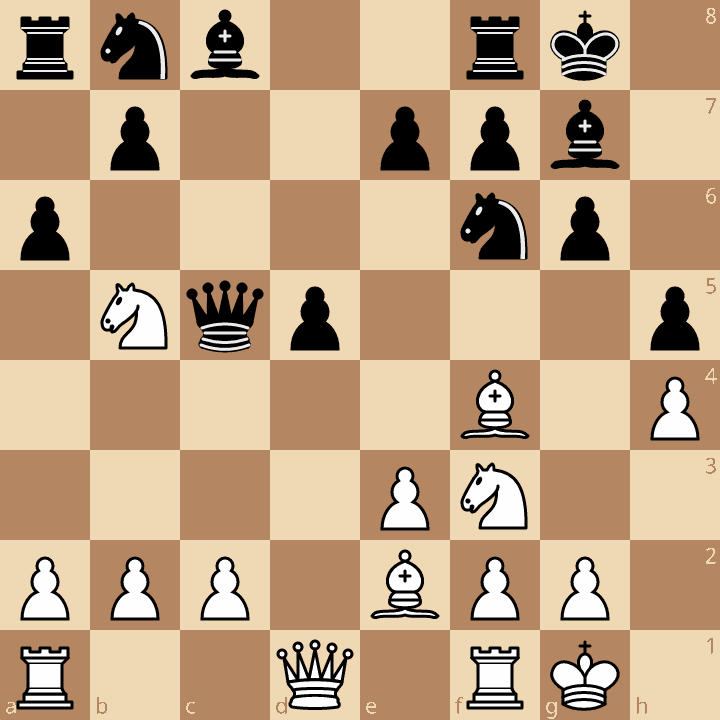
Black recaptures the pawn, restoring material equality. The queen on c5 is centralized, but White's knight is about to jump to b5. The position is balanced materially, but White has a concrete tactical idea ready.
Jump the knight to threaten an invasion on c7.
♘︎b5 — The trademark Jobava jump! The knight leaps to b5, threatening ♘︎c7 — invading with a powerful outpost that attacks the rook on a8. This is exactly why White played ♘︎c3 instead of ♘︎f3 — the knight has an aggressive path to b5 and c7. Black must respond to the ♘︎c7 threat immediately, giving White the initiative.
Alternative Moves
Black attacks the knight, which must now move. However, the knight has already achieved its goal — Black was forced to weaken the queenside with ..a6 and White retains the initiative. The position is dynamically balanced. White's best is the jump ♘︎c7, hitting the rook on a8, while ♘︎c3 is the quiet retreat.
Key Takeaways
- ♘︎c3 instead of ♘︎f3 is the defining move — it enables ♘︎b5 and supports e4
- ♗︎f4 must come before e3 to avoid trapping the bishop
- h4 is a signature aggressive push, claiming kingside space
- The ♘︎b5 jump threatens ♘︎c7, attacking the rook on a8 — a recurring tactical theme
- Black counters with ...c5 and fianchetto setups, but White keeps the initiative
Now play it through
Step through every move on a real board, try the wrong ones, and ask Knighty why they fail.
Related Lessons
Summary
Ready to Practice?
Next in this opening family
Benko Gambit
Take this lesson with you
Free account requiredWith every variation — opens in Lichess & ChessBase