
KID Four Pawns Attack
White builds an imposing four-pawn center with d4+c4+e4+f4, but Black counterattacks with ...c5 and ...e6 to undermine it before it rolls forward.
Try Interactive LessonIntroduction
Lesson Content
The Queen's Pawn opening — White claims the center with the d-pawn, which is immediately defended by the queen. This tends to lead to more strategic, closed positions compared to 1. e4. Black's main responses: - 1. ..d5 — Queen's Gambit and Slav setups - 1. ..♘︎f6 — Indian Defenses (King's Indian, Nimzo-Indian, etc.) - 1. ..f5 — Dutch Defense
Develop the knight to control the e4 square.
♘︎f6 — Black develops the knight and controls e4, preventing White from building the ideal e4+d4 center easily. This is the gateway to all Indian Defense systems. Black delays committing a pawn structure, staying flexible to choose between King's Indian, Nimzo-Indian, Queen's Indian, and more.
Alternative Moves
White reinforces control of d5 and grabs more space. Combined with d4, the two pawns dominate the center. Now Black's response determines the opening system: - 2. ..e6 — Nimzo-Indian (after 3. ♘︎c3 ♗︎b4) or Queen's Indian - 2. ..g6 — King's Indian or Grunfeld - 2. ..c5 — Benoni structures - 2. ..e5 — Budapest Gambit
Prepare the bishop fianchetto.
g6 — Black prepares to fianchetto the bishop on g7, leading to either the King's Indian Defense (..d6, ..♗︎g7) or the Grunfeld Defense (..d5, ..♗︎g7). Both are hypermodern — Black allows White a big center, then attacks it. The choice between King's Indian and Grunfeld typically comes on move 3 or 4.
Alternative Moves
White develops the knight to its natural square, supporting both d5 and e4 advances. This is the main line of the King's Indian, allowing White to choose between many systems on the next moves. White's alternatives: - 3. ♘︎f3 — flexible, can lead to the Fianchetto system - 3. f3 — Samisch setup directly - 3. g3 — immediate fianchetto commitment
Complete the fianchetto and activate your bishop.
The bishop takes its powerful diagonal, controlling the long a1-h8 diagonal. This is the signature piece of the King's Indian — the ♗︎g7 is a sleeping dragon that becomes powerful when the center opens. The bishop supports ..e5 and ..d5 breaks while also providing latent pressure on White's queenside.
Alternative Moves
White seizes more central space, building the pawn duo d4+e4. This is the standard KID setup — White has a commanding center and will choose how to develop based on the desired system. White's fifth move will define the variation: - 5. f4 — Four Pawns Attack, the most aggressive - 5. ♘︎f3 — Classical or Fianchetto - 5. f3 — Samisch, preparing ♗︎e3 without ..♘︎g4
Support the e5 advance with your d-pawn.
Black commits to the King's Indian structure by supporting a future ..e5. The d6 pawn controls e5 and c5, forming the backbone of Black's position. This move distinguishes the King's Indian from the Grunfeld (where Black plays ..d5). Black's plan is to allow White a big center, then strike at it with ..c5 or ..e5.
Alternative Moves
The Four Pawns Attack! White builds the most imposing center possible — four pawns abreast on c4, d4, e4, and f4. This is the most aggressive system against the KID, aiming to crush Black with a central steamroller. The risk: the f4 push weakens the kingside (especially the e3 and g3 squares) and the center can become a target if Black reacts correctly. As the saying goes — a broad pawn center is either a strength or a weakness.
Castle to safety before challenging the center.
O-O — Black castles to safety before launching the counterattack. The king is tucked away, the rook comes to f8, and Black is ready to challenge White's center. Castling first is important — Black needs a safe king before opening the position with ..c5 and ..e6.
Alternative Moves
White develops the kingside knight, preparing to castle. The knight supports the d4 and e5 squares. White's alternatives: - 6. ♗︎e2 — developing the bishop first, also standard - 6. ♗︎d3 — more aggressive but slightly less flexible
Strike at the heart of White's pawn center.
c5 — The key counterattack! Black strikes at the d4 pawn, the heart of White's pawn center. This is the thematic reaction to the Four Pawns Attack — challenge the center before White can consolidate. After 7. d5, the position takes on a Benoni character with an asymmetric pawn structure and sharp play for both sides.
Alternative Moves
White advances the d-pawn rather than exchanging, creating a closed center. This gains space but also creates a fixed target — the d5 pawn will need constant protection. The position now resembles a Modern Benoni structure with the extra f4 pawn giving White more kingside options but also more weaknesses.
Challenge the d5 pawn before White consolidates.
e6 — Black immediately challenges the d5 pawn! This is the critical thematic break — half-opening the e-file and the long diagonal for the ♗︎g7. After the trades on d5, Black will have active piece play against White's center. Delaying this break would allow White to consolidate with ♗︎e2, O-O, and then the center becomes a genuine strength rather than a weakness.
Alternative Moves
White develops the bishop to a solid square, preparing to castle. ♗︎e2 supports the center and keeps the position flexible. This is the Normal Attack of the Four Pawns — the most principled continuation. White plans to castle, then push e5 to break through.
Capture to half-open the e-file for your rooks.
exd5 — Black opens the center! Capturing on d5 creates the half-open e-file — a highway for Black's rooks. The d5 pawn was holding White's center together; now the structure becomes more dynamic. This trade is timed perfectly — White hasn't castled yet, so Black can seize the initiative on the open files.
Alternative Moves
White recaptures with the c-pawn, maintaining the central pawn mass. The d5 pawn is now a space-gaining wedge supported by e4 — a potential long-term asset. White's plan is clear: push e5 to open lines and use the central pawns as a battering ram. But the half-open e-file gives Black counterplay.
Activate your rook on the e-file to pressure the center.
♖︎e8 — The rook occupies the half-open e-file, targeting the e4 pawn — the foundation of White's center. This is a key developing move that prepares for the coming tactical battle. The rook on e8 anticipates White's e5 push — after the pawn exchanges, the rook will be perfectly placed on the half-open file.
Alternative Moves
The thematic central break! White pushes e5, opening lines and trying to use the central pawn mass as an attacking weapon. This is the whole point of the Four Pawns Attack — the center charges forward. But this push also opens the position for Black's pieces, especially the ♗︎g7 and the ♖︎e8. The tactics that follow determine the character of the middlegame.
Capture the pawn to prevent being cramped.
dxe5 — Black captures, eliminating White's e5 pawn and half-opening the d-file. This is forced in practice — allowing e5 to stay would cramp Black's position completely. After White recaptures with fxe5, Black's rook on e8 hits the e5 pawn, which becomes a target.
Alternative Moves
White recaptures with the f-pawn, maintaining the advanced e5 pawn. This half-opens the f-file but also leaves the e5 pawn potentially vulnerable. The position is now critical — White has a passed d5 pawn and the advanced e5, but Black's pieces are poised for counterplay.
Attack the e5 pawn with your knight.
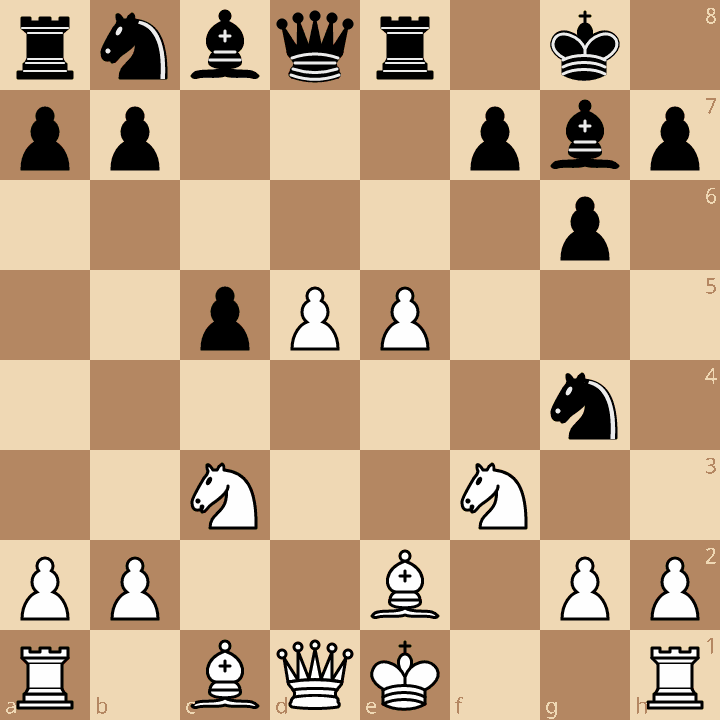
Black attacks the e5 pawn with the knight! The ♘︎g4 also eyes e3: once the c1 bishop moves, ..♘︎e3 can fork the queen on d1 and, after castling, a rook on f1. This is a key tactical motif in the Four Pawns Attack. The knight on g4 is ideally placed — it pressures e5, eyes e3, and cannot be easily chased away. Black has successfully challenged White's imposing center and generated active counterplay.
Alternative Moves
Key Takeaways
- The Four Pawns Attack (f4) builds the biggest possible center but weakens the kingside
- Black must counterattack with ...c5 and ...e6 before White consolidates
- After d5 and exd5 cxd5, the position takes on a Benoni-like structure
- ♖︎e8 anticipates the thematic e5 push, placing the rook on the open file
- ♘︎g4 attacks e5 and eyes the e3 fork square (queen and castled rook) — the key tactical motif for Black
Now play it through
Step through every move on a real board, try the wrong ones, and ask Knighty why they fail.
Related Lessons
Summary
Ready to Practice?
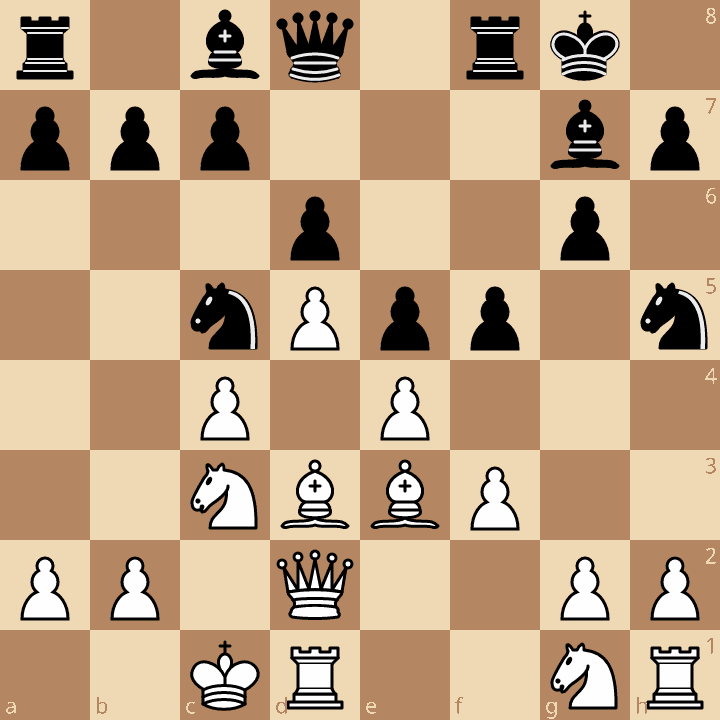
Next in this opening family
King's Indian - Sämisch Variation
Take this lesson with you
Free account requiredWith every variation — opens in Lichess & ChessBase