
Larsen's Opening - Classical Setup
A hypermodern flank opening where White fianchettoes the dark-squared bishop on b2 and builds a flexible central setup
Try Interactive LessonIntroduction
Lesson Content
Prepare to fianchetto your dark-squared bishop.
b3 — Larsen's Opening — White prepares to fianchetto the dark-squared bishop to b2, controlling the long diagonal. Instead of occupying the center immediately, White takes a hypermodern approach. Black's main responses: - 1. ..e5 — the most popular, claiming the center directly - 1. ..d5 — equally sound, establishing central control - 1. ..♘︎f6 — flexible, keeping options open
Alternative Moves
Black claims the center directly with the d-pawn — a principled response. While White focuses on the flank, Black seizes central space, controlling e4 and c4.
Alternative Moves
Complete the fianchetto on the long diagonal.
♗︎b2 — The bishop fianchettoes immediately — the whole point of 1. b3. From b2, the bishop commands the a1-h8 diagonal, exerting long-range pressure on e5 and toward the kingside. This is the defining move of Larsen's Opening.
Alternative Moves
Black develops the knight to its most natural square, controlling e4 and d5 while preparing to castle. The knight on f6 is a universal developing move that works in almost any setup.
Develop your knight to control the center.
White develops the knight to its best square, controlling e5 and d4 while preparing kingside castling. The ♘︎f3/♗︎b2 duo creates a harmonious partnership — both pieces pressure the dark squares.
Alternative Moves
Black solidifies the d5 pawn with e6, creating a stable pawn chain. The light-squared bishop is temporarily locked in, but Black plans to develop it via b7 after ..b6 — a mirror fianchetto.
Support the center while opening a diagonal for your bishop.
Supporting the center and opening the diagonal for the light-squared bishop. The e3/b3 pawn structure is the classic Larsen formation — modest but solid, keeping all options open for d3 or d4 later.
Alternative Moves
Black develops the bishop to a solid, flexible square and prepares to castle. ♗︎e7 is modest but practical — it doesn't commit to an aggressive diagonal yet.
Develop your bishop and prepare to castle.
♗︎e2 — The light-squared bishop develops to a flexible square, preparing to castle. From e2, the bishop supports d3 or can later relocate to f3 for central pressure. White prioritizes completing development over an immediate central push.
Alternative Moves
Black castles to safety. The king is secure on g8, and the f8 rook can support the center or shift to the c-file later.
Castle to safety before starting central operations.
O-O — White also castles kingside, securing the king. With both bishops developed and the king safe, White is ready to begin central operations with d4 and c4.
Alternative Moves
Black mirrors White's strategy — preparing a queenside fianchetto with ..♗︎b7. Both sides will have bishops on the long diagonals, creating a symmetrical fianchetto structure.
Strike in the center now that development is complete.
Now is the right time to seize the center! With development complete and the king safe, White strikes with d4. The ♗︎b2 supports this advance, and the position takes on a Queen's Gambit-like character where White has a central advantage.
Alternative Moves
Black completes the fianchetto. The ♗︎b7 eyes the a8-h1 diagonal, ready to pressure e4 and the ♘︎f3 once the d5 pawn moves. Both sides now have symmetrical fianchetto structures, but White has a central space advantage thanks to d4.
Expand in the center with the classic pawn duo.
The Queen's Gambit formation! White establishes the classic d4+c4 pawn center, controlling d5 and e5. This is the strategic payoff of the Larsen approach — White delayed the central push until all pieces were developed, then struck with full support.
Alternative Moves
Black captures, resolving the central tension. This gives up the d5 stronghold but opens lines and avoids passive positions. White will recapture with the bishop, gaining active development.
Alternative Moves
Recapture with the bishop to activate it.
♗︎xc4 — The bishop recaptures on an excellent square. From c4, it targets the sensitive e6/f7 area and controls d5. White has active pieces and a central pawn majority.
Black develops the last minor piece, preparing to play ..c5 to challenge White's d4 pawn. The knight on d7 supports both ..c5 and ..e5 breaks while keeping the position flexible.
Develop your last piece to its most active square.
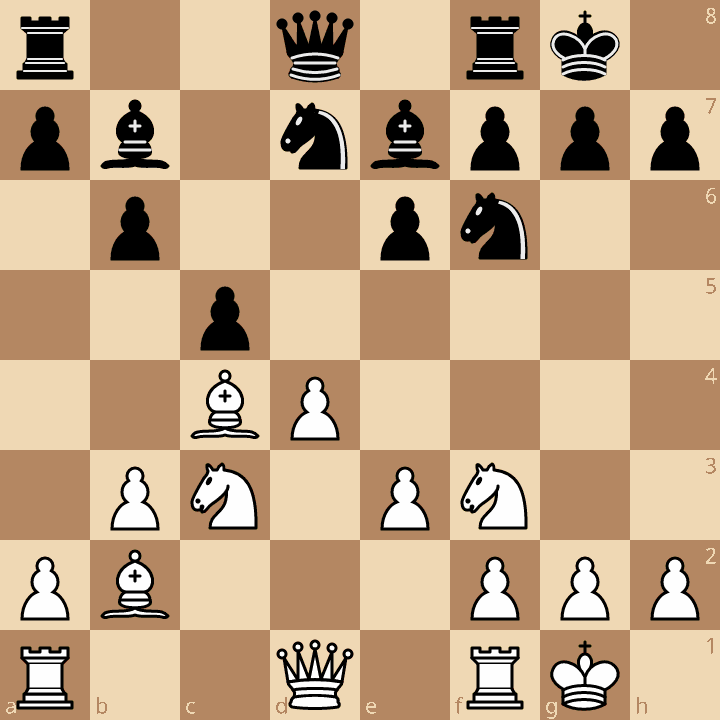
♘︎c3 — White completes piece development with the knight heading to c3. From here, it supports the center (d5 push), controls e4, and adds pressure to the position. White has achieved a model Larsen setup — ♗︎b2 on the long diagonal, ♗︎c4 targeting the kingside, knights centralized, and pawns on d4.
Alternative Moves
Black challenges White's d4 pawn — the standard counter in these structures. The position is dynamically balanced: White has central presence and active bishops, while Black has solid development and central counterplay.
Key Takeaways
- 1.b3 + ♗︎b2 puts the dark-squared bishop on the powerful a1-h8 diagonal
- Complete development before pushing d4 — timing is key
- The d4 + c4 push creates a strong central presence with full piece support
- ♗︎xc4 recaptures actively, targeting Black's kingside
- The ♗︎b2 is Larsen's long-term asset — it influences the game throughout
Now play it through
Step through every move on a real board, try the wrong ones, and ask Knighty why they fail.
Related Lessons
Summary
Ready to Practice?
Take this lesson with you
Free account requiredWith every variation — opens in Lichess & ChessBase