
Traxler Counterattack
Black ignores the ♘︎g5 threat to f7 and counter-attacks with 4...♗︎c5, sacrificing a pawn for active piece play and a dangerous initiative against the exposed White king.
Try Interactive LessonIntroduction
Lesson Content
The King's Pawn opening — White claims the center and opens diagonals for the queen and kingside bishop. The most popular first move in chess. Black's main responses: - 1. ..e5 — Open Game, matching White's center - 1. ..c5 — Sicilian Defense, fighting for d4 asymmetrically - 1. ..e6 — French Defense, preparing ..d5 - 1. ..c6 — Caro-Kann, also preparing ..d5
Match White in the center with your own king pawn.
Black mirrors White's central claim, establishing a symmetrical pawn center. This leads to the Open Games — the oldest and most classical family of openings. The e5 pawn controls d4 and f4, limiting White's expansion options.
White develops the knight to its most natural square, attacking the e5 pawn immediately. The knight also controls d4 and prepares kingside castling. This is the most common second move, leading to a vast tree of openings including the Italian, Ruy Lopez, and Scotch.
Defend your e5 pawn while developing a piece.
♘︎c6 — Black defends the e5 pawn with the most natural developing move. The knight on c6 also controls the important d4 and e5 squares. From here White's third move defines the opening: - 3. ♗︎c4 — Italian Game - 3. ♗︎b5 — Ruy Lopez - 3. d4 — Scotch Game - 3. ♘︎c3 — Three Knights Game
The bishop develops to c4, aiming at Black's vulnerable f7 square — the weakest point in the starting position since only the king defends it. This is the defining move of the Italian Game. White's alternatives here lead to entirely different openings: - 3. ♗︎b5 — the Ruy Lopez, pressuring the ♘︎c6 defender - 3. d4 — the Scotch Game, immediately challenging the center - 3. ♘︎c3 — the Three/Four Knights, delaying the decision
Counter-attack the e4 pawn with your knight.
♘︎f6 — The Two Knights Defense — Black develops aggressively, counterattacking White's e4 pawn rather than passively defending. This is more combative than 3. ..♗︎c5. Black invites the sharp Knight Attack (4. ♘︎g5) or the calmer 4. d3.
The Knight Attack — White sends the knight to g5, threatening the devastating ♗︎xf7+ or ♘︎xf7 fork. This is the most aggressive reply to the Two Knights Defense and the move that provokes the Traxler. The standard response is 4. ..d5 (the main line), but the Traxler offers a much sharper alternative.
Ignore the threat to f7 and counter-attack f2 with your bishop.
♗︎c5 — The Traxler Counterattack! Instead of defending f7 with the standard 4. ..d5, Black ignores the threat entirely and counter-attacks White's f2 square. The bishop on c5 creates immediate pressure on f2, and if White captures on f7, Black gains time to develop an initiative. This move requires nerves of steel — Black is essentially daring White to take the pawn, trusting that the resulting active piece play will compensate.
Alternative Moves
White takes the pawn with check, the objectively strongest continuation. The bishop sacrifice opens the king's position and forces Black to give up castling rights. White's alternatives: - 5. ♘︎xf7 — takes the other way, but after 5. ..♗︎xf2+ 6. ♔︎f1 ♕︎e7 7. ♘︎xh8 d5, Black gets a fierce attack for the exchange - 5. d4 — a calmer approach, but 5. ..d5 equalizes comfortably
Move the king — you planned for this when playing 4...Bc5.
♔︎e7 — Black steps up with the king — the natural reply. While losing castling rights looks alarming, Black gains important compensation: the h8-rook will soon become active via the half-open f-file without needing to castle. The king on e7 is surprisingly safe in the short term, shielded by the central pawns.
White retreats the bishop to c4, keeping it on the dangerous a2-g8 diagonal. The bishop still eyes f7 and supports potential ♘︎d5+ ideas. White has an extra pawn and Black has lost castling rights — but White must develop carefully to maintain the advantage. Alternatively, 6. ♗︎b3 is also played, but ♗︎c4 is more active.
Reposition your queen to a flexible defensive and offensive square.
♕︎e8 — The queen repositions to e8, a multi-purpose move. From e8, the queen keeps an eye on the kingside (it can swing to h5 or g6), and clears d8 for the king to tuck away if needed. This is the strongest move — the queen is flexible on e8 and doesn't block any piece development.
White develops the knight to c3, reinforcing control of d5 and e4. This is solid development — White is trying to consolidate the extra pawn while completing development. The knight also supports a potential ♘︎d5+ jump later, which could be powerful against Black's exposed king.
Drive the annoying knight away from g5.
h6 — Black kicks the knight from g5, which was threatening to return to dangerous squares. After the knight retreats, Black's position is much more comfortable — the g5 irritant is removed and Black can focus on development. This is a necessary move before the knight can create further mischief.
The knight retreats to f3, its most natural square. From f3, it supports d4 and controls key central squares. White is regrouping — the knight on g5 was active but unstable, and ♘︎f3 is a more reliable post. White's plan is to finish development with ♗︎e2, O-O, and try to exploit the extra pawn in a calm position.
Stabilize the center and free your bishop.
Black solidifies the center and opens the diagonal for the c8-bishop. The d6 pawn supports e5 and prepares ..♗︎g4 or ..♗︎f5 development. With the center stable, Black can focus on activating the remaining pieces. An alternative is 8. ..♔︎d8, tucking the king away immediately, but d6 is more flexible.
Alternative Moves
White moves the bishop from c4 to e2, preparing to castle kingside. The bishop on e2 is less aggressive than on c4 but allows White to complete development and get the king to safety. This is the strongest move — White prioritizes king safety and consolidation over maintaining the bishop on the a2-g8 diagonal.
Jump into the center with a powerful knight move.
♘︎d4 — An excellent central jump! The knight lands on the powerful d4 square, threatening the ♘︎f3 and creating tactical complications. From d4, the knight eyes e2 (the newly placed bishop), c2, and f3. This is the Traxler's spirit — Black fights back with active piece play. The knight on d4 cannot be easily challenged and forces White to react.
White plays d3, solidifying the center and preparing to develop the c1-bishop. White avoids the knight trade on d4 (♘︎xd4 exd4 would give Black an active pawn and half-open the e-file), preferring to keep the position stable. White is still better objectively but must be careful — Black's pieces are becoming active.
Capture the bishop to disrupt White's position.
♘︎xe2 — Black captures the bishop on e2, winning the bishop pair and disrupting White's coordination. After ♕︎xe2, Black has traded off a key defensive piece and the open lines start to favor Black's rooks. This trade is good for Black — the bishop on e2 was supporting White's kingside castling plans.
White recaptures with the queen, which is forced. The queen on e2 is centralized but now White has lost the light-squared bishop, making castling kingside less appealing. White still has the extra pawn, but Black's active pieces and the half-open f-file provide real counterplay.
Activate your rook on the half-open f-file.
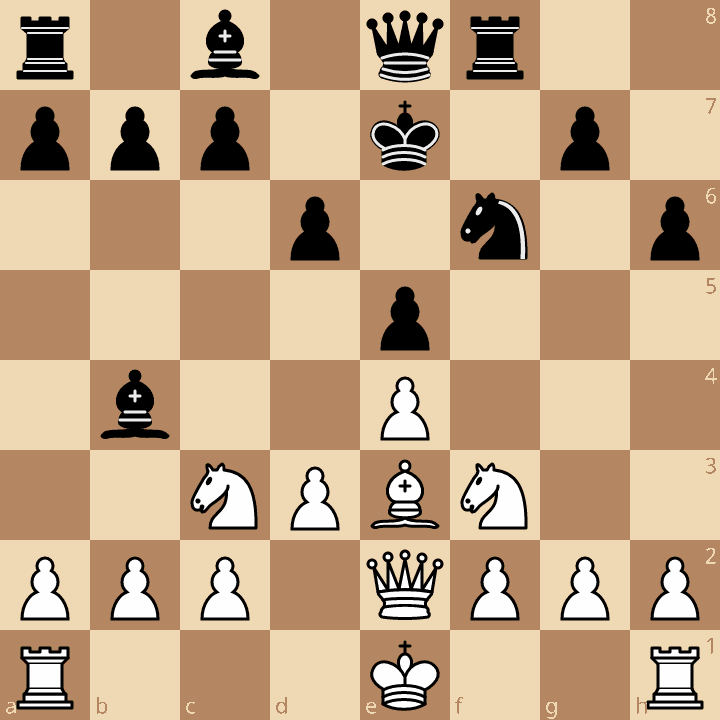
♖︎f8 — The rook swings to the half-open f-file — this is Black's main compensation for the pawn sacrifice. Without needing to castle, the rook is already active on its ideal file. Once Black's f6 knight moves, the rook bears down on White's knight on f3. This is the payoff of the Traxler — Black's rook is more active than it would be in most normal openings.
White develops the last minor piece, preparing to castle. The bishop on e3 is solid, defending d4 and supporting the center. White is still slightly better but Black's active pieces make it a complex middlegame where practical chances are roughly even.
Pin the knight with your bishop.
♗︎b4 — Black moves the bishop to an active square, pinning the ♘︎c3 against the king. The bishop on b4 creates concrete pressure — if White castles kingside, the pin on the knight becomes even more significant. Black has active pieces on every front: the rook controls the f-file, the bishop pins the knight, and the queen is ready to join the attack. Despite being a pawn down, Black has excellent practical compensation.
Key Takeaways
- 4...♗︎c5 is the Traxler — instead of defending f7, Black counter-attacks f2 and dares White to take
- After 5.♗︎xf7+ ♔︎e7, Black loses castling rights but gains the half-open f-file for the rook and active piece development
- 6...♕︎e8 repositions the queen to a flexible square — it eyes the kingside, and can swing to the attack
- 9...♘︎d4 is a key move — Black seizes the initiative by jumping into the center and forcing White to trade the bishop
- Even in an objectively worse position, Black's active pieces and practical complications make the Traxler a potent surprise weapon
Now play it through
Step through every move on a real board, try the wrong ones, and ask Knighty why they fail.
Related Lessons
Summary
Ready to Practice?
Next in this opening family
Fried Liver Attack
Take this lesson with you
Free account requiredWith every variation — opens in Lichess & ChessBase