
Caro-Kann Defense - Classical Variation
Solid defense where Black develops the bishop before e6
Try Interactive LessonIntroduction
Lesson Content
Start with the king pawn.
e4 — The King's Pawn opening — White claims the center and opens diagonals for the queen and kingside bishop. The most popular first move in chess. Black's main responses: - 1. ..e5 — Open Game, matching White's center - 1. ..c5 — Sicilian Defense, fighting for d4 asymmetrically - 1. ..e6 — French Defense, preparing ..d5 - 1. ..c6 — Caro-Kann, also preparing ..d5
Alternative Moves
The Caro-Kann Defense — like the French, Black prepares ..d5, but via c6 instead of e6. The key advantage: the light-squared bishop stays unblocked. The Caro-Kann is considered one of the most solid defenses to 1. e4, favored by players who want a reliable, low-risk structure.
Establish a strong pawn center.
d4 — White builds the full pawn center. After 2. ..d5, White must decide how to handle the tension: - 3. ♘︎c3 or 3. ♘︎d2 — maintain the tension - 3. e5 — Advance Variation, gaining space - 3. exd5 cxd5 — Exchange, leading to symmetrical pawn structure
Alternative Moves
Black challenges the e4 pawn as planned. Unlike the French (1. ..e6 2. ..d5), the c6 pawn supports d5 while leaving the light-squared bishop free to develop actively.
Develop a piece that defends your e4 pawn.
♘︎c3 — Defending the e4 pawn with the most natural developing move. The knight on c3 also controls d5, maintaining the central tension and preparing for the main theoretical battles. White's alternatives lead to fundamentally different structures: - 3. e5 — the Advance Variation, gaining space but allowing Black counterplay with ..c5 and ..♗︎f5 - 3. exd5 cxd5 — the Exchange Variation, releasing tension early
Alternative Moves
Black captures the e4 pawn, creating a temporary pawn imbalance. The whole point of this capture is strategic: Black wants to develop the light-squared bishop to f5 *before* playing ..e6. This is the key difference from the French Defense — in the Caro-Kann, Black avoids locking in the bad bishop.
Recapture with the knight to centralize it.
♘︎xe4 — Recapturing with the knight centralizes it powerfully on e4, where it controls key squares (d6, f6, c5, g5). This is a dominant centralized piece that Black must respect. Material is level again, and White's knight is superbly placed.
Alternative Moves
The hallmark of the Caro-Kann Classical — the bishop develops to f5 *before* the e6 pawn is played. This is precisely why Black played 1. ..c6 instead of 1. ..e6: to keep this diagonal open. The ♗︎f5 bishop is Black's most valuable minor piece in this structure. Keeping it active compensates for the slight space disadvantage.
Attack the bishop with your knight.
♘︎g3 — Attacking the bishop and forcing it to move again. While White is also moving the knight a second time, the trade-off is worthwhile — the knight on g3 supports h4-h5 pawn thrusts and aims at f5. This sets the stage for White's characteristic h4-h5 space-gaining plan on the kingside.
Alternative Moves
The bishop retreats to g6, staying outside the pawn chain. While less active than on f5, the bishop is still free and still stays on the b1-h7 diagonal. Black accepts this modest retreat because the alternative — being pushed all the way to h7 after h5 — is strategically worse. Either way, the bishop remains active compared to its French Defense counterpart.
Push a pawn to threaten the bishop.
An aggressive pawn thrust! White gains kingside space and threatens h5, which would permanently restrict the bishop on g6. This is one of the most characteristic moves in the Caro-Kann Classical. The h4-h5 plan is a double-edged sword: White gains space but also weakens the kingside slightly. In practice, the space advantage outweighs the risk.
Alternative Moves
A prophylactic move: it prepares ..♗︎h7 if White pushes h5. The pawn on h6 also controls g5, keeping White's pieces at bay. Black accepts a small weakening of the kingside to maintain flexibility for the bishop.
Develop your other knight.
♘︎f3 — Completing knight development to the most natural square. The knight on f3 controls e5 and d4 while preparing to castle when the bishop develops. White delays h5 for one move to prioritize development — a pragmatic decision. The h5 push remains a key plan for the next move.
Alternative Moves
Black develops the knight to d7, keeping the c-pawn free for potential ..c5 counterplay. The knight prepares to support ..♘︎gf6 and ..e6, completing Black's development. The ♘︎d7 square is typical in the Caro-Kann — from here the knight can reroute to b6, f6, or e5 depending on the position.
Push the h-pawn to restrict the bishop.
Now h5! This permanently fixes the bishop — it must retreat to h7, where it will be passive for the remainder of the opening. White gains lasting space on the kingside. The h5 pawn also creates a hook for future attacks if the game opens up. White's space advantage on the kingside is now firmly established.
Alternative Moves
The bishop retreats to h7 — passive but safe. While the bishop is restricted, it still performs a useful defensive function and can re-enter the game via a later ..♗︎xd3 exchange. Black's compensation for the passive bishop is a rock-solid pawn structure with no weaknesses — the classic Caro-Kann trade-off.
Develop your bishop toward the h7 bishop.
♗︎d3 — Developing the bishop to d3 with a specific purpose: offering a trade of light-squared bishops. By eliminating Black's remaining active minor piece, White accentuates the structural advantage. After ♗︎xd3, ♕︎xd3 recaptures with development, placing the queen on an active central square. White's plan is coming together.
Alternative Moves
Black accepts the trade — keeping the passive bishop on h7 long-term would be strategically suffocating. The trade at least gives Black a cleaner position. Now Black can focus on solid development with ..e6, ..♘︎gf6, and castling, without worrying about the cramped bishop.
Recapture to develop your queen.
♕︎xd3 — Recapturing with the queen places it on a powerful central square. From d3, the queen supports the d4 pawn, eyes the kingside (b1-h7 diagonal), and coordinates with the developing pieces. Capturing with cxd3 would double the pawns and fail to develop — the queen recapture is clearly superior.
Alternative Moves
Now Black can safely play ..e6, since the light-squared bishop has already been traded. This is the whole point of the Caro-Kann move order — had Black played ..e6 earlier, the bishop would have been trapped inside. The e6 pawn solidifies d5 and opens a diagonal for the dark-squared bishop to develop.
Develop your last minor piece.
Developing the last minor piece to its most active square. The bishop on f4 eyes the c7 and d6 squares, exerting pressure on Black's slightly cramped position. With ♗︎f4, White is ready to castle queenside, creating the possibility of opposite-side castling and aggressive play with the g and h-file rooks.
Alternative Moves
Black completes knight development. The position is solid but cramped — White has more space on the kingside, which is the enduring legacy of the h4-h5 push. Black's plan from here is to castle and then seek counterplay with ..c5, challenging White's center.
Castle queenside for aggressive play.
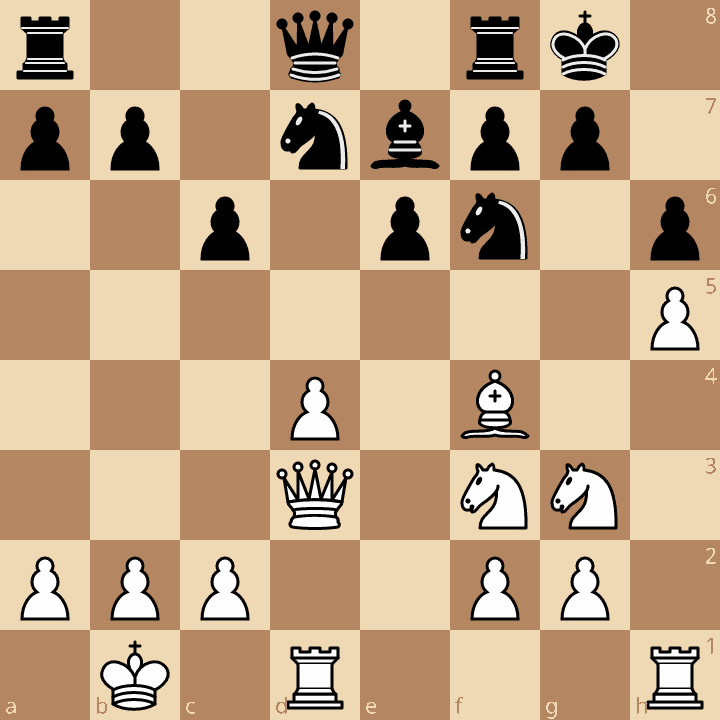
O-O-O — Castling queenside for maximum aggression! Opposite-side castling means both sides can throw pawns at the enemy king without weakening their own. The h5 pawn already gives White space on the kingside. This transforms the game from a quiet positional struggle into a dynamic race — White storms the kingside while Black seeks counterplay with ..c5 on the queenside.
Alternative Moves
Black develops the bishop to e7, preparing to castle kingside. The bishop is modest on e7 but performs necessary defensive duties, supporting ...O-O. With opposite-side castling imminent, both sides must balance attacking ambitions with defensive necessities.
Tuck your king to safety.
♔︎b1 — A subtle but important prophylactic move — removing the king from the c-file before Black opens it with ..c5. The king on b1 is much safer, tucked into the corner away from tactical tricks. This is a standard technique in opposite-side castling positions: secure your own king before launching the attack.
Alternative Moves
Black castles kingside, completing development. With kings on opposite sides of the board, the stage is set for the classic Caro-Kann Classical middlegame: White will attack the kingside using the h-file and centralized pieces, while Black counterattacks on the queenside with ..c5. The race is on — whoever's attack arrives first will have the advantage.
Key Takeaways
- ...♗︎f5 before ...e6 is the key Caro-Kann idea
- h4-h5 gains space and restricts Black's bishop
- ♗︎d3 trades off Black's good light-squared bishop
- Opposite-side castling leads to sharp attacking play
- White has more space; Black has a solid pawn structure
Now play it through
Step through every move on a real board, try the wrong ones, and ask Knighty why they fail.
Related Lessons
Summary
Ready to Practice?
Next in this opening family
Caro-Kann - Panov-Botvinnik Attack
Take this lesson with you
Free account requiredWith every variation — opens in Lichess & ChessBase