
King's Indian Attack vs the French
A potent anti-French system where White sidesteps theory with 2.d3, builds the KIA setup, and launches a kingside attack with e5.
Try Interactive LessonIntroduction
Lesson Content
Start by controlling the center with your king pawn.
e4 — The King's Pawn opening — White claims the center and opens diagonals for the queen and kingside bishop. The most popular first move in chess. Black's main responses: - 1. ..e5 — Open Game, matching White's center - 1. ..c5 — Sicilian Defense, fighting for d4 asymmetrically - 1. ..e6 — French Defense, preparing ..d5 - 1. ..c6 — Caro-Kann, also preparing ..d5
The French Defense — Black prepares ..d5 to challenge White's center on the next move. The pawn on e6 supports d5 but blocks the light-squared bishop, which is the main strategic downside of the French. The French leads to rich strategic battles around White's pawn chain.
Sidestep French theory with this quiet but flexible pawn move.
The surprise! Instead of the standard 2. d4, White plays the modest d3 — entering the ♔︎ing's Indian Attack. This sidesteps the entire French Defense theory and signals a different approach: develop pieces first, commit the center later. White plans ♘︎d2, ♘︎gf3, g3, ♗︎g2, O-O, then strike with e4-e5 when fully prepared.
Alternative Moves
Black claims the center as planned in the French. The d5 pawn stakes out space and creates a solid pawn chain with e6. Against the KIA, Black's structure is sound but slightly passive — the light-squared bishop remains hemmed in. Black will aim for ..c5, ..♘︎c6, and queenside expansion to counter White's kingside buildup.
Develop the knight to d2, keeping the c-pawn free.
White develops the knight to d2 rather than c3 — a hallmark of the KIA. From d2, the knight keeps the e4 pawn protected and can reroute to f1-e3 or f1-g3 for a kingside attack. Crucially, ♘︎d2 avoids blocking the c-pawn, keeping c2-c3 and c2-c4 options open. This is the key structural difference from standard French lines where ♘︎c3 is played.
Alternative Moves
Black develops the knight to its most natural square, controlling e4 and d5. The ♘︎f6 piece prevents White from establishing a strong center immediately and prepares kingside castling. Black's other options: - 3. ..c5 — immediately fighting for space on the queenside - 3. ..♘︎c6 — developing toward d4 control
Develop the second knight to its natural square.
The second knight develops to f3, controlling e5 and d4 while preparing kingside castling. Together with ♘︎d2, White now has a solid foundation for the g3/♗︎g2 fianchetto. The move order ♘︎d2 before ♘︎gf3 matters — it kept the e4 pawn defended, avoiding ..dxe4 and an early queen trade.
Alternative Moves
Black grabs queenside space with the thematic ..c5 advance. This is the standard counter-strategy against the KIA: build a strong queenside while White focuses on the kingside. The c5 pawn controls d4 and prepares ..♘︎c6. Black's queenside expansion with ..c5, ..♘︎c6, ..b5 is the main source of counterplay.
Prepare the bishop fianchetto — the backbone of the KIA.
g3 — The fianchetto preparation — the defining structural choice of the King's Indian Attack. White prepares to place the bishop on g2, where it will exert long-term pressure along the a8-h1 diagonal. This diagonal becomes especially powerful once the center opens after e5. White deliberately keeps the center compact (d3/e4) and builds around it.
Alternative Moves
Black develops the knight to c6, adding support to d4 and e5 while reinforcing the ..c5 pawn. The knight on c6 is well-placed for queenside operations and helps contest the center. Black now has a solid setup: pawns on d5/e6/c5 and knights on f6/c6. The next priority is completing development with ..♗︎e7 and ...O-O.
Complete the fianchetto — the bishop belongs on the long diagonal.
The bishop takes its place on the long diagonal, completing the fianchetto. From g2, it aims at e4 and d5 behind the f3 knight, and will become a monster once e5 opens the center. The ♗︎g2 is the strategic backbone of the KIA. With ♘︎f3, ♘︎d2, g3, and ♗︎g2 in place, White is nearly ready to castle and prepare the e5 break.
Alternative Moves
Black develops the bishop to a solid, classical square. ♗︎e7 prepares castling and defends the kingside without overcommitting. The bishop may later retreat to f8 to support a kingside defense if White pushes e5 and attacks. Black's alternatives: - 6. ..♗︎d6 — more active but exposed to a later e4-e5 push - 6. ..b6 — fianchetto approach, developing the light-squared bishop
Castle to safety before launching your central offensive.
O-O — White castles kingside, securing the king. With the king safe, White can focus entirely on the strategic plan: ♖︎e1 to support the e-pawn, c3 to solidify the center, then the critical e5 push. The KIA setup is now nearly complete — only ♖︎e1 and c3 remain before the central break.
Alternative Moves
Black also castles, completing basic development. Both kings are now safe and the strategic battle begins in earnest. White will build toward e5; Black will seek queenside counterplay with ..b5, ..♕︎c7, and piece pressure. The position is balanced but rich — the character of the middlegame depends on timing.
Place the rook behind your e-pawn to prepare the advance.
The rook shifts to e1, directly supporting the e4 pawn and preparing the crucial e5 advance. This is the most natural continuation — the rook behind the e-pawn adds power to White's central push. With ♖︎e1, the full KIA battery is in place: ♗︎g2 on the diagonal, ♘︎f3 controlling e5, and ♖︎e1 backing the pawn. The e5 break is now imminent.
Alternative Moves
Black places the queen on c7, preparing to contest the e5 square. The queen also supports the ..b5 advance and eyes the c-file for future operations. This is a typical French Defense regrouping — the queen often lands on c7 to coordinate Black's queenside counterplay.
Lock down the center before launching your attack.
White solidifies the center with c3, preventing any ..d4 break and preparing a future d3-d4 advance if needed. The c3 pawn also covers the d4 square, making the pawn structure rock-solid. With c3, White's setup is fully complete: ♘︎f3, ♘︎d2, g3, ♗︎g2, O-O, ♖︎e1, c3. Everything is ready for e5.
Alternative Moves
Black centralizes the rook on the d-file, supporting the d5 pawn and preparing for central exchanges. The rook on d8 is well-placed if the center opens — if White plays exd5, Black can recapture and use the d-file. Black is well developed and ready, but White has a concrete plan — the e5 advance is coming.
Push! This is the move the entire setup was built for.
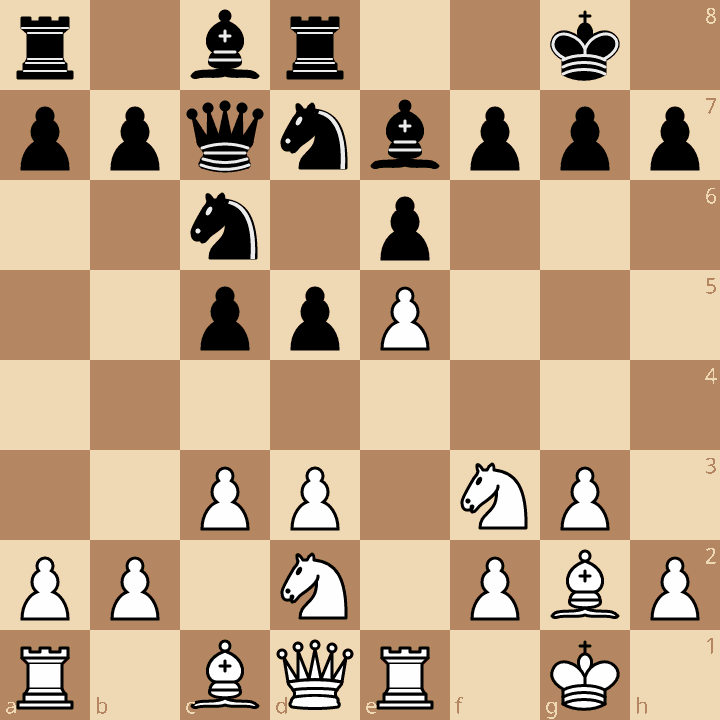
The thematic central break — the whole point of the King's Indian Attack! White pushes e5, gaining space in the center and driving back the ♘︎f6. This pawn locks the center and creates a permanent space advantage on the kingside. After e5, White's plan is clear: build a kingside attack with f4, ♘︎f1-e3 (or ♘︎f1-h2), and piece maneuvers toward the enemy king. Fischer won several brilliant games from exactly this type of position.
Alternative Moves
The knight retreats to d7, forced back by the e5 pawn. From d7 the knight attacks the e5 pawn, but it has lost its active post. This is the strategic consequence of White's e5 push — Black's pieces become cramped. White now continues with d4 (opening the position further) or ♘︎f1-e3, building toward a kingside attack. The KIA has achieved its goal.
Key Takeaways
- 2.d3 sidesteps all main-line French theory — no Winawer, no Advance, no Classical
- ♘︎d2 (not ♘︎c3) keeps the c-pawn free for c3, a hallmark of the KIA
- The fianchettoed ♗︎g2 becomes a monster once e5 opens the diagonal
- ♖︎e1 + c3 completes the preparation before the e5 break
- After e5, White has a natural kingside attack — Black is cramped and must find counterplay quickly
Now play it through
Step through every move on a real board, try the wrong ones, and ask Knighty why they fail.
Related Lessons
Summary
Ready to Practice?

Next in this opening family
French Defense - 2.Nf3 Variation
Take this lesson with you
Free account requiredWith every variation — opens in Lichess & ChessBase