
Ruy Lopez - Marshall Attack
A famous pawn sacrifice in the Ruy Lopez where Black gives up the e5 pawn for a fierce kingside attack
Try Interactive LessonIntroduction
Lesson Content
The King's Pawn opening — White claims the center and opens diagonals for the queen and kingside bishop. The most popular first move in chess. Black's main responses: - 1. ..e5 — Open Game, matching White's center - 1. ..c5 — Sicilian Defense, fighting for d4 asymmetrically - 1. ..e6 — French Defense, preparing ..d5 - 1. ..c6 — Caro-Kann, also preparing ..d5
Match White in the center with your own king pawn.
Black mirrors White's central claim, establishing a symmetrical pawn center. This leads to the Open Games — the oldest and most classical family of openings. The e5 pawn controls d4 and f4, limiting White's expansion options.
White develops the knight to its most natural square, attacking the e5 pawn immediately. The knight also controls d4 and prepares kingside castling. This is the most common second move, leading to a vast tree of openings including the Italian, ♖︎uy Lopez, and Scotch.
Defend your e5 pawn while developing a piece.
♘︎c6 — Black defends the e5 pawn with the most natural developing move. The knight on c6 also controls the important d4 and e5 squares. From here White's third move defines the opening: - 3. ♗︎c4 — Italian Game - 3. ♗︎b5 — Ruy Lopez - 3. d4 — Scotch Game - 3. ♘︎c3 — Three Knights Game
The Ruy Lopez (Spanish Game) — one of the deepest and most respected openings. White puts pressure on the ♘︎c6 — the key defender of e5. If Black later moves the d7 pawn, the knight becomes pinned to the king. The idea is not to capture immediately but to maintain long-term pressure. Black's main responses: - 3. ..a6 — Morphy Defense (most popular), challenging the bishop - 3. ..♘︎f6 — Berlin Defense, solid and drawish - 3. ..d6 — Steinitz Defense, passive but solid
Challenge the bishop and gain time.
a6 — The Morphy Defense — Black immediately questions the bishop's position. White must decide: retreat (4. ♗︎a4, maintaining tension) or exchange (4. ♗︎xc6, doubling pawns but ceding the bishop pair). 4. ♗︎a4 is the main line, keeping the pressure and the option to exchange later.
White retreats the bishop, maintaining the indirect pin on the ♘︎c6. The bishop stays on the a4-e8 diagonal, keeping long-term pressure on Black's queenside. The alternative 4. ♗︎xc6 gives up the bishop pair for doubled c-pawns — the Exchange Variation, a completely different character.
Develop your knight and counter-attack the e4 pawn.
♘︎f6 — Black develops the knight to f6, counterattacking the e4 pawn. This is the most natural and popular response, preparing to castle kingside. The knight on f6 is a key piece in the Marshall Attack — it will later recapture on d5 after the central break.
Alternative Moves
White castles, securing the king. This is the main line of the Closed Ruy Lopez — the most important and deeply analyzed system. White's king is now safe, but it will become the target of Black's Marshall Attack later.
Develop your bishop and prepare to castle.
♗︎e7 — Black develops the bishop to e7, preparing to castle. This modest square is ideal — the bishop supports kingside defense. The Closed Ruy Lopez begins. Black's plan is to castle and then prepare the Marshall Attack with ..b5, ...O-O, and eventually ..d5.
Alternative Moves
White places the rook behind the e4 pawn, supporting the center. The rook on e1 also prepares for potential e-file play after a future d5 break by Black. This move invites the Marshall Attack. Many modern players prefer 6. d3 to avoid the sharp gambit play entirely.
Push the bishop back while gaining queenside space.
Black chases the bishop away from the a4-e8 diagonal. This is a key preparatory move — once the bishop retreats to b3, Black will castle and prepare the ..d5 break. The b5 push also gains queenside space and opens the possibility of ..♗︎b7 later.
White retreats to b3, keeping the bishop on the strong a2-g8 diagonal aimed at f7. The bishop is well-placed here — safe from further harassment and targeting Black's kingside. From b3, the bishop will prove useful in the middlegame after the center opens.
Castle to safety and prepare the central break.
O-O — Black castles, completing kingside development. Everything is now in place for the Marshall Attack — the knight is on f6 ready to recapture on d5, and the rook will join the attack via the f-file or e-file. The stage is set for the critical 8. ..d5 break.
White plays c3, preparing the standard d4 central advance. This is the classical continuation that allows the Marshall Attack. Many top players today prefer 8. a4 — the Anti-Marshall — specifically to avoid the dangerous gambit that follows. The fact that White sidesteps c3 speaks to how potent the Marshall is!
Sacrifice the center pawn to open lines for your attack!
d5 — The Marshall Attack! Black sacrifices the e5 pawn to blast open the center. After 9. exd5 ♘︎xd5, the e5 pawn will fall — but Black gets a massive lead in development, open lines for all pieces, and a dangerous kingside attack. Frank Marshall allegedly saved this move for 8 years before unleashing it against Capablanca in 1918. The gambit remains one of the most deeply analyzed and respected in all of chess.
Alternative Moves
White captures, virtually forced. Declining with 9. d4 allows Black an excellent game after 9. ..dxe4, and 9. e5 lets Black equalize easily. The capture opens the e-file and half-opens the d-file — both of which Black will use to generate attacking chances.
Recapture with the knight to centralize powerfully.
♘︎xd5 — Black recaptures with the knight, placing it powerfully in the center. The ♘︎d5 controls key squares and is perfectly centralized. Critically, the e5 pawn is now attacked twice and defended only once — Black is offering it as a gambit. The compensation lies in Black's superior development and open lines for attack.
White accepts the gambit, capturing the free e5 pawn. The knight on e5 looks strong, but it will soon be driven away. White is now a pawn up materially — but Black's initiative and attacking chances provide full compensation. Declining the pawn with a quiet move would leave White with no advantage, so this capture is the principled response.
Exchange knights to open the position for your attack.
♘︎xe5 — Black trades knights, opening the position further. After 11. ♖︎xe5, Black will have powerful piece play along the open files and diagonals. This trade clears the center and accelerates Black's attack — the fewer pieces blocking the lines, the more dangerous Black's initiative becomes.
White recaptures with the rook, which now sits actively on e5. However, the rook is somewhat exposed here and can become a target. Black now has multiple ways to develop the attack — open diagonals and the half-open d-file and the open e-file all favor Black's pieces.
Secure your knight and prepare the attacking setup.
c6 — Black solidifies the ♘︎d5 outpost by supporting it with the c-pawn. This is the modern main line — the knight on d5 becomes a permanent fixture, controlling key squares while Black prepares the attack. From here, Black's plan involves ..♗︎d6 to target the ♖︎e5 and h2, ..♗︎f5 for the bishop, and ..♕︎h4 to launch the kingside assault. White must defend very accurately.
Alternative Moves
Key Takeaways
- 8...d5 is the Marshall Attack — a pawn sacrifice for rapid development and open lines
- Black gets compensation through piece activity, open files, and kingside attacking chances
- The knight on d5 (supported by ...c6) is a cornerstone of Black's position
- White must defend precisely — one mistake and Black's attack becomes decisive
- Many top players prefer 8.a4 (Anti-Marshall) to avoid this dangerous gambit entirely
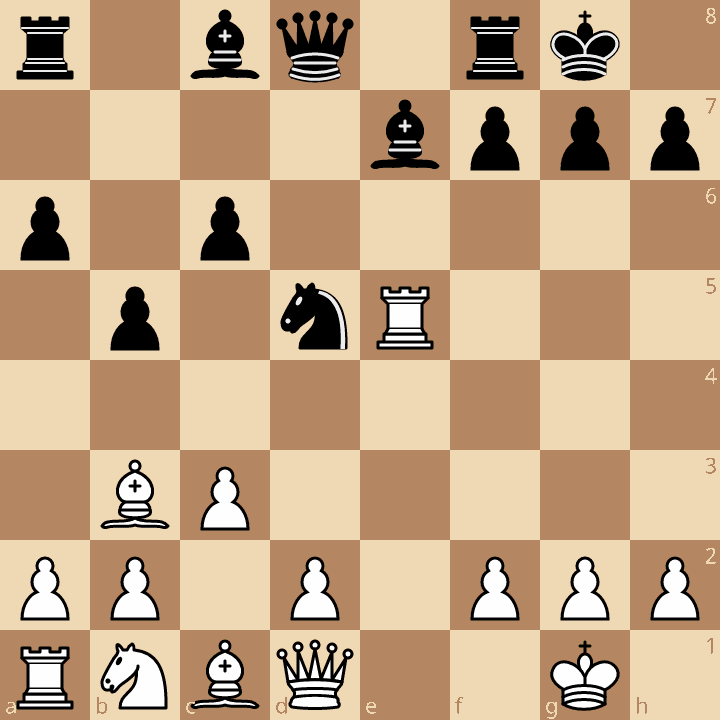
Now play it through
Step through every move on a real board, try the wrong ones, and ask Knighty why they fail.
Related Lessons
Summary
Ready to Practice?
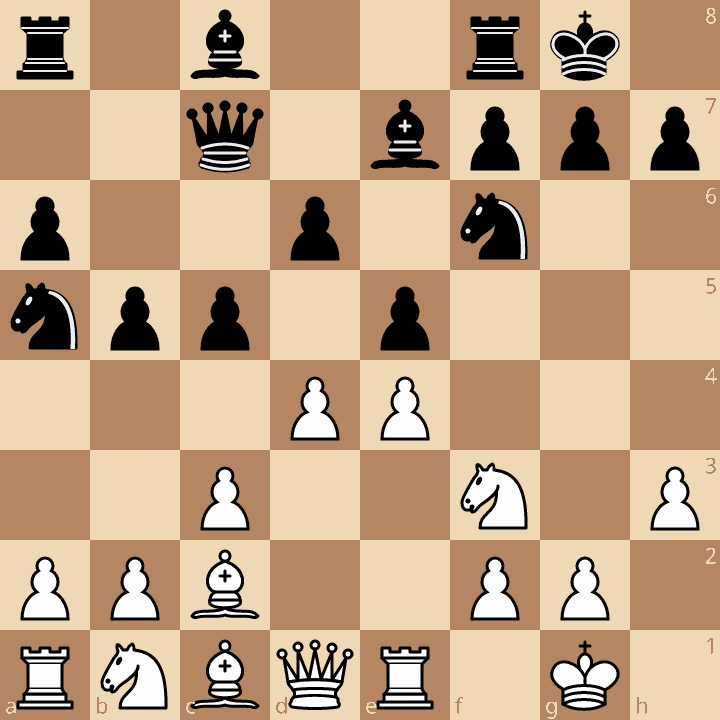
Next in this opening family
Ruy Lopez - Closed (Chigorin)
Take this lesson with you
Free account requiredWith every variation — opens in Lichess & ChessBase