
QGD Ragozin Defense
Combine QGD solidity with Nimzo-Indian dynamism — pin the knight with ♗︎b4 and strike at the center with ...c5.
Try Interactive LessonIntroduction
Lesson Content
The Queen's Pawn opening — White claims the center with the d-pawn, which is immediately defended by the queen. This tends to lead to more strategic, closed positions compared to 1. e4. Black's main responses: - 1. ..d5 — Queen's Gambit and Slav setups - 1. ..♘︎f6 — Indian Defenses (King's Indian, Nimzo-Indian, etc.) - 1. ..f5 — Dutch Defense
Mirror White and claim your share of the center.
d5 — Black matches White in the center, leading to the Queen's Pawn Game. The symmetrical center typically results in strategic maneuvering rather than immediate tactical battles. White's most popular continuation is 2. c4 — the Queen's Gambit.
The Queen's Gambit — White offers a pawn to lure Black's d5 pawn away from the center. It's not a true gambit since Black can't hold the pawn long-term. Black's main choices: - 2. ..e6 — Queen's Gambit Declined, solid and classical - 2. ..c6 — Slav Defense, supporting d5 while keeping the bishop free - 2. ..dxc4 — Queen's Gambit Accepted, giving up the center temporarily
Reinforce your center pawn.
The Queen's Gambit Declined — Black reinforces d5 solidly. The downside is the same as in the French: the light-squared bishop is blocked behind the e6 pawn. This is one of the most classical and well-respected opening systems in chess.
White develops the knight to its natural square, adding pressure on d5 and supporting a future e4 advance. This is the most common continuation. Now Black should develop the kingside knight — and importantly, 3. ..♘︎f6 keeps the Ragozin option open (4. ..♗︎b4 after 4. ♘︎f3).
Alternative Moves
Develop the knight to its natural square.
♘︎f6 — Black develops the knight to its best square, controlling e4 and d5. This is the most natural response and keeps all options open — including the Ragozin (4. ..♗︎b4), the Orthodox QGD (4. ..♗︎e7), and the Semi-Slav (4. ..c6).
Alternative Moves
White develops the second knight, controlling e5 and d4. This is the move that allows the Ragozin — with the knight on f3 rather than the bishop on g5, Black's ♗︎b4 pin is most effective. White's alternatives lead to different systems: - 4. ♗︎g5 — enters the Orthodox QGD immediately - 4. cxd5 — Exchange Variation - 4. e3 — quiet development
Alternative Moves
Pin the knight — the key move of the Ragozin!
♗︎b4 — The Ragozin Defense! Black pins the ♘︎c3, preventing e4 — the same strategic idea as the Nimzo-Indian, but with d5 already played. This is the defining move of the opening. The bishop on b4 creates immediate pressure: if White plays e4, the pinned knight cannot defend it; and Black threatens ..♗︎xc3 to double White's pawns. The Ragozin combines QGD solidity with Nimzo-Indian dynamism.
Alternative Moves
White's most aggressive response — pinning the ♘︎f6 and adding pressure on d5. The idea is to exchange on f6 and weaken Black's kingside structure, or maintain the pin to restrict Black's development. White's main alternatives: - 5. ♕︎a4+ — a tricky check forcing ..♘︎c6 - 5. ♕︎b3 — pressuring the bishop on b4 - 5. e3 — quiet development, avoiding complications - 5. cxd5 — Exchange Variation of the Ragozin
Alternative Moves
Challenge the bishop — force it to decide.
Black challenges the bishop immediately. This is the most principled response — forcing White to declare intentions. After 6. ♗︎xf6 ♕︎xf6, Black gets the bishop pair and active queen placement. The alternative 5...O-O is also playable, but ..h6 forces a favorable resolution of the pin right away.
Alternative Moves
White exchanges the bishop for the knight. After ..♕︎xf6, Black gets the bishop pair — a long-term advantage. But White simplifies the position and can focus on exploiting the central structure. The alternative 6. ♗︎h4 maintains the pin but the bishop sits awkwardly on h4, and Black can proceed with ...O-O and ..c5.
Alternative Moves
Recapture with the queen to keep the bishop pair.
♕︎xf6 — Black recaptures with the queen, gaining the bishop pair. The queen on f6 is actively placed — it eyes the d4 pawn and the kingside. Black now plans ...O-O and the thematic ..c5 break.
White solidifies the center with e3, supporting d4 and opening the diagonal for the bishop. This is a practical choice — White prepares calm development rather than the sharper 7. ♕︎b3. White's alternatives: - 7. ♕︎b3 — pressuring b4 and d5, the most critical theoretical line - 7. ♕︎a4+ — another aggressive option
Alternative Moves
Castle first — secure the king before expanding.
O-O — Black castles to safety before executing the central plan. The king is secure, and Black is ready for the thematic ..c5 break or ..dxc4 followed by ..c5. The immediate 7. ..c5 is equally strong, but castling first is more flexible.
Alternative Moves
White places the rook on the c-file, anticipating the opening of this file after dxc4 and ♗︎xc4. This is the most accurate move — White prepares to recapture on c4 with the bishop while the rook already controls the open file.
Alternative Moves
Capture — prepare to challenge the d4 pawn next.
dxc4 — Black captures the c4 pawn, opening the center. This is a key moment — by exchanging on c4, Black prepares ..c5 with greater effect since White's central pawn duo (c4+d4) is broken. White will recapture with the bishop, and Black follows up with ..c5 to challenge d4.
Alternative Moves
White recaptures with the bishop, developing to an active diagonal. The bishop on c4 eyes the f7 square and supports the center. White is now ready to castle and enter the middlegame.
Strike at the center with the thematic pawn break!
c5 — The thematic Ragozin pawn break! Black challenges the d4 pawn, activating the ♗︎b4 and opening lines for the rooks. This is the strategic payoff — after the trade on d4, Black will have active piece play with the bishop pair in an open position. This is the key moment of the entire Ragozin system.
Alternative Moves
White castles to safety before dealing with the central tension. With both kings safe, the middlegame battle begins — White will aim to use the centralized pieces while Black leverages the bishop pair and open lines.
Open the position to maximize your bishop pair advantage.
cxd4 — Black captures on d4, opening the position. In open positions, the bishop pair becomes a powerful advantage. Black's bishops on b4 and c8 will find active diagonals, and the open c-file provides rook activity.
Alternative Moves
White recaptures with the knight, centralizing it powerfully on d4. The knight controls key squares (b5, c6, e6, f5) and the position is dynamically balanced. Black has the bishop pair and will develop the ♗︎c8 and ♘︎b8, while White has the central knight and well-placed pieces. A typical continuation is ..♖︎d8 followed by ..♗︎d7 and ..♘︎c6, with a rich strategic middlegame ahead.
Key Takeaways
- 4...♗︎b4 is the Ragozin's defining move — pinning the ♘︎c3 to prevent e4, combining QGD and Nimzo-Indian ideas
- 5...h6 challenges the bishop, and the trade on f6 gives Black the bishop pair — a key long-term asset
- The ...dxc4 followed by ...c5 pawn break sequence is the strategic heart of the Ragozin — it opens the position for the bishops
- In the resulting positions, Black's bishop pair compensates for any slight structural concessions
- White's main plans involve centralizing the knight on d4 and exploiting the open c-file
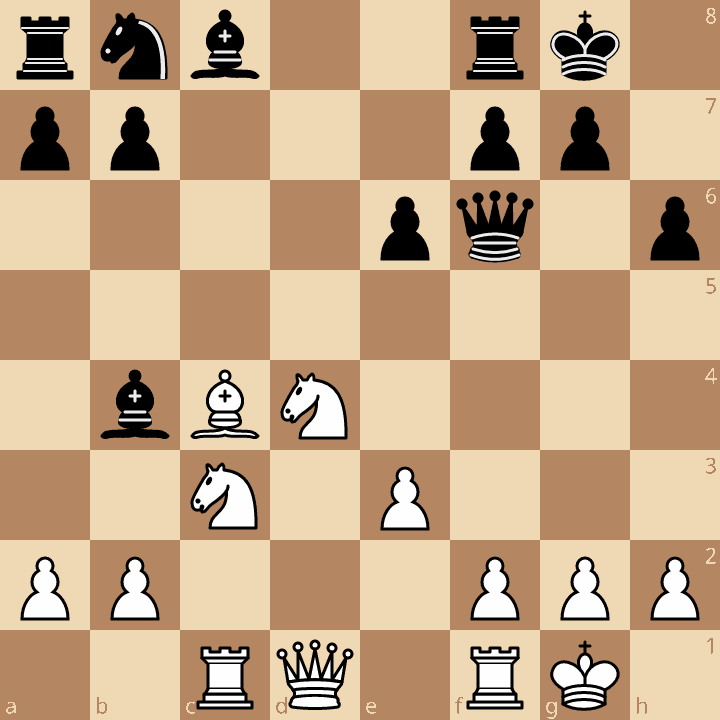
Now play it through
Step through every move on a real board, try the wrong ones, and ask Knighty why they fail.
Related Lessons
Summary
Ready to Practice?
Next in this opening family
Elephant Trap
Take this lesson with you
Free account requiredWith every variation — opens in Lichess & ChessBase